There are a number of ways you can control how and where your users login to OpenCRM. These include:
- Setting your Password Policy
- Adding Session Timeouts
- IP Blocking
For more information on Two-Factor or Multi-Factor Authentication please refer to this article.
Setting Your Password Policy
Admins can do this by following these steps;
- Select Settings > Configuration > Additional Settings
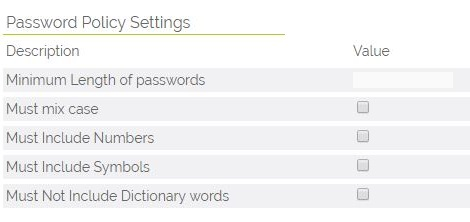
- Scroll down to the Password Policy Settings

And configure the settings as you require.
Session Timeouts
You can set how long your users are able to be inactive before they are automatically logged out of the system. This is a great way to ensure an idle PC doesn't leave your important CRM data exposed to anyone who walks by.
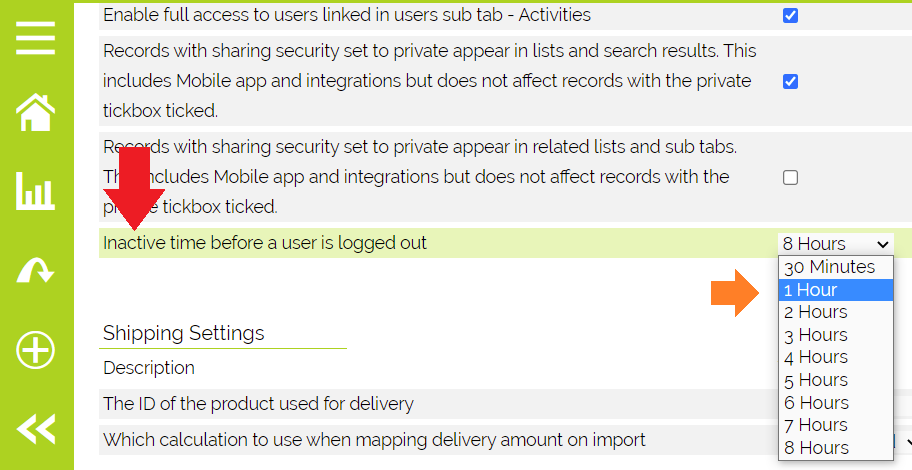
To set this up, simply go to Settings > Configuration > Additional Settings and click the Security Settings option.
You will then see the following option:

This will give you the option to choose from several time periods. If a user is inactive for any more than that time period, they will need to log back in before being able to access OpenCRM. It does not refresh the page, though, so no worries about losing unsaved data.
Setting a Password Expiry Policy
A Password expiry policy can be applied to OpenCRM user accounts. There are two settings in Additional Settings under "Password Policy"
- Enable password expiry
- Maximum password age (in days)
Configure these as required.
The user is warned when they log in, up to 7 days before the password is due to expire.
IP Blocking / Banning
An administrator can activate the Authorised IP checking facility in OpenCRM to make sure users can only log in from specific IP addresses.
Activating
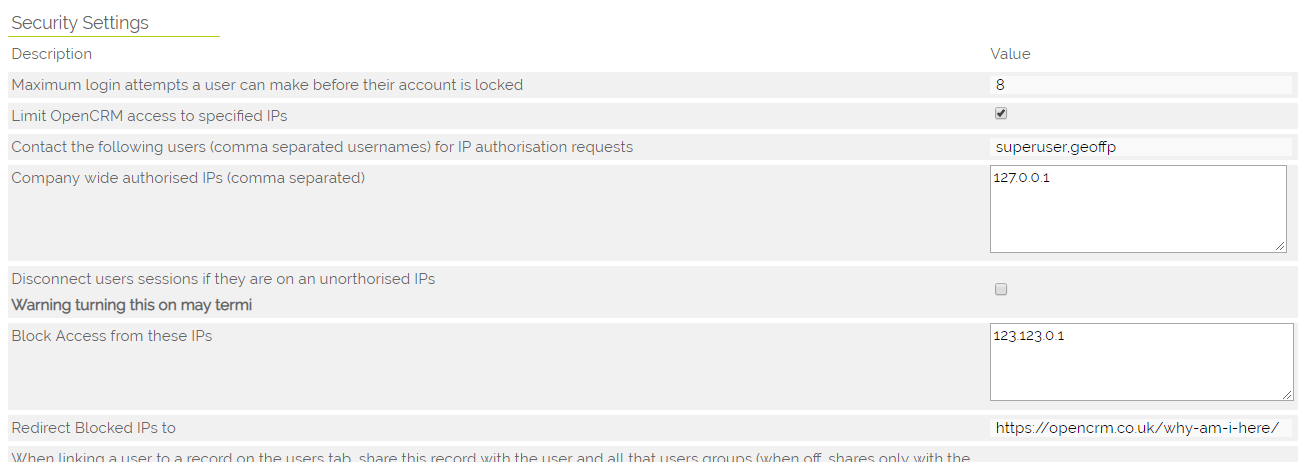
From Settings, open Additional Settings and then find the Security settings block shown below,

To activate the feature, tick the 'Limit OpenCRM access to specified IPs' box
You will also need to enter the usernames of one or more users with admin access, these users will need to be available to enter IPs when a user needs access from a currently unauthorised location.
Setting Authorised IPs
To set global access from some IP addresses, for example, your own offices, enter these in the Company wide authorised IPs Box
Enter a list of IP addresses that are allowed to access your OpenCRM system. Leave this box blank to only use per User IP address, or enter *.*.*.* to allow access from anywhere (this however will have the same effect as turning the feature off).
To set the authorised IPs at a user level, edit the User record in question, at the bottom of the edit screen you will see this box;

As before enter the IPs that this User is allowed access from.
Terminating Sessions
If you tick the Disconnect users sessions if they are in the unauthorised IPs box, you need to be sure all allowed IPs are entered, either on the company global list or on the relevant users. If a user is not on a recognised IP their OpenCRM session will be terminated upon their next page load. This includes your own session so when this box is ticked if you are on an unrecognised IP your session will be terminated and you will be unable to re-log in until another administrator has authorised your IP address or turned off the feature.
Banning IPs
In the security settings is a box to block access from specific IPs this takes a list just the same as the allow box, only this is a blacklist of IPs, no one will be able to access the system from any of the specified IPs, similar to ticking the box to disconnect users if they're not on authorised IPs, adding an IP to this list will block access to anyone on that IP even if they are already logged in. However, instead of just disconnecting their session, they will be redirected to the website page specified in the Redirect Blocked Ips to box.
How It Works
When a user tries to log in to OpenCRM the list of IP addresses that have access to the company is added to the list that is stored against the user that is trying to log in. If you have entered *.*.*.* on either of these lists or both lists are blank then the feature is disabled for this login attempt. If however there is a list of IP addresses, the user's current IP address is checked against this dynamic list, if this finds a match then they are allowed access and their password is checked as normal. If the IP is not on the list then the user is not allowed access and they are returned to the login page displaying an information message.
Requesting Access
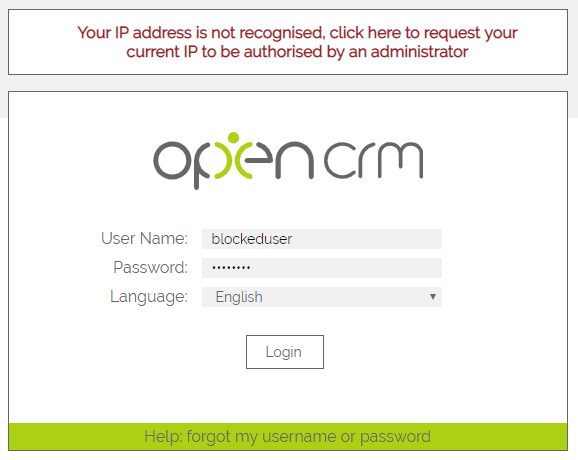
When a User is blocked because they are accessing from an unauthorised IP address the user will see the message below;

This tells the user the feature is enabled and provides a link to request their current IP be authorised by an administrator. Clicking this link will give the User a where they can request IP authorisation.
This form allows the user to send a message to the Administrator responsible for authorising IPs, the message sent will automatically include the IP the user is currently using. The message box is there for the user to confirm they are who the message claims them to be, this could be by providing details that can only be found on their user record, or maybe an agreed upon passphrase.
Before being able to submit this form the user will need to enter the code shown, this is just to confirm they are human and not spam robots trying to use the form for mischief.
Disclaimer: All IPs in the screenshots are made up and any systems they do point at have nothing at all to do with OpenCRM.
Need More Help?
If you have any questions, just start a Live Chat, "Click" on the Chat Icon in the lower right corner to talk with our support team.


