Custom views are a way of filtering data on the Home pages of all the entities.
These are useful in two ways:
1. They allow you to add alternative columns in a view
e.g. instead of displaying Company Name, City & Phone etc. you might want to display Company Name, Company Type & Annual Revenue
2. They allow you to create/view specific subsets of data (filter the data by using queries) for you to action, such as adding to a Campaign, sending a mailshot etc.
e.g. My Companies or A-List Companies etc.
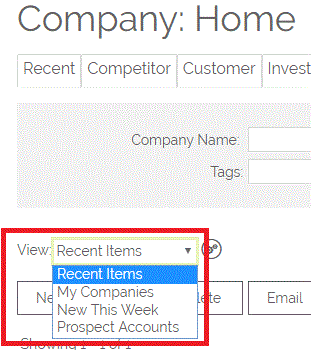
The screenshot below shows the Custom View Selector drop-down on the Companies module which enables you to switch between views.

Who can set up Custom Views
By default, creating or editing Custom Views is restricted to Admin users. If you want ALL users to have this ability, you can do so by going to Settings > Additional Settings > Custom View Settings and enabling the following:

Please note the associated option that allows you to set new custom views to be available to ALL users by default.
Creating a Custom View
Admin users can create and edit views using the Edit and Create View functions next to the view selector. This is collapsed by default:

The menu is ordered to show:
- Your Default View at the top
- Your Profile Default View below that (if applicable)
- Then by name (0-9, a-z)
Clicking on the cogs opens up the options to create/ edit/ delete the Custom Views:

Clicking Admin enables you to see all Custom Views configured in that module, including any that are not set to be visible to you (thereby enabling the Admin user to edit views configured for other users).
Before you begin it is a good idea to make a note of order of the current columns that are already familiar to you. Views can be set up in six simple steps.
1. Set up some basic view information (View and Tab name)
2. Specify View visibility for particular users or on a per Profile basis.
3. Select which columns you wish to see on the home screen.
4. Set some Date filters
5. Set some other filters (e.g. Username, Company Type, Opportunity Stage etc.)
6. Specify an Order for the records in the view to be displayed.
1. Set up the basic view parameters (View and Tab name)
Click on Create View, give the view a name, and tick the List in Metrics tick box if you want this view to appear on your Dashboard. Giving the view a Tab Name allows you to list the View in the row of tabs on the Companies: Home screen. If you are duplicating an existing view, tick the Create as new view box.

2. Specify View visibility for particular Users or on a per Profile basis.
You can specify, at User or Profile level, who can access the View, who can see it by Default (ie so they see this View whenever they log into this module), or who can see the View as a Tab.

3. Select which columns you wish to see on the home screen.
You can display information from up to fifteen columns on the Home screen. Use the drop-down menu on each field to select the data you want to display.

4. Set some Date filters.
You can use any of the Date fields you use (e.g. Created Date, Modified Date, End Date) and specify a Date Range for example Current Week, Current Month, Next 90 Days

When you use the Custom option you will be able to use the filters for "Selected Dates", "Next", "Last", "More Than" and "Less That" you will then get the choice of unit of time so 1, 2, 3 etc then you will have option between Days, Weeks, Months and Years. You can use these filters to create views to display e.g. "All Companies created in the last 21 days":

You can also filter on more than one date field or date range. This is done by selecting two (or more) date periods, and selecting "Any" rather than "All".
This gives you the ability ton include e.g. Activities from the Last 14 Days and Next 14 Days within a view, or include filters on separate date fields.
5. Set some Advanced Filters (e.g. Username, Company Type, Opportunity Stage etc.)

You can add as many rows as you need.
Note: To create one view for all users e.g. My Companies, use Assigned to - equals - {username}
6. Specify an Order for the records in the view to be displayed.
You may wish to sort your data alphabetically based on Company Name, or City. Or you might want to sort records based on a Date field. Use the Default Result Ordering section to specify the sort order:

Important: If you do not add yourself to the view (either by User or Profile), the view will not be available in the list of Views that you can access. Admins can override this restriction by selecting the Admin option next to the View box.
Also, you need to give Users or Profiles the ability to access the custom view, in order for them to be able to use the default view or tab options.
Setting up Custom View Mini-Tabs
Mini-Tabs are the Tabs that are available to select above the main records grid. You can watch the below video to find out more or read on:
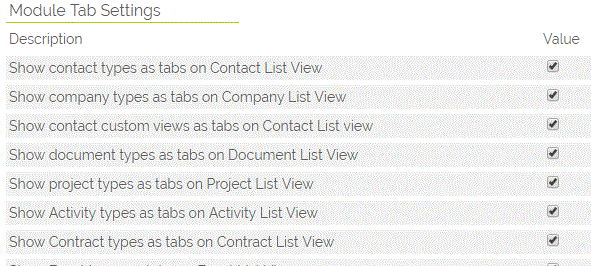
Under Module Tabs on the Additional Settings page are that options to turn on displaying types as tabs and custom views as tabs on the list view.
Turning on these either of these options will turn on the tabs. If both are active then the types will be displayed before the custom views as tabs.

To control the types that are displayed, you need to open the Contact Type picklist editor (Settings > Picklist Settings > Edit Contact Picklist > Contact Type).
This will have an extra block of 1s and 0s along side the values list, this defaults to 1 unless told otherwise. Setting the tab display value for a line to 0 will turn that tab off, setting it to 1 will reactivate the tab.

As you can see in the screenshot above different Tab types have been set to be Visible (1) and Invisible (0). The results will be then displayed at the top of the relevant module (in this case Contacts) like this: 
To change which Custom Views are displayed, you need to edit each one you want adding as a tab individually. To begin with under the View Name you also have a field where you can enter the Tab name. 
At the top of the view edit screen where you control if the view is visible to users and/or profiles, there is the option to set if the view is displayed as a tab for that user and/or profile. If a user can not see a view it wont appear as a tab for them even if you tick it for them.

If you choose to select this by Profile, any future users who have that profile will also see this custom view as a tab.

Important: These tabs will also dictate what will show up in this field for any "pop-up" search.
Need More Help?
If you have any questions, just start a Live Chat, "Click" on the Chat Icon in the lower right corner to talk with our support team.


