For an in-depth view of the Campaigns functionality, please take a look at our 45 minute webinar :
The Campaigns module is a deep and powerful tool in OpenCRM. It is where you can group selected Leads, Contacts and Companies together in order to target them with a Campaign.
Once you have sent an email Campaign, you can then track the results - click-throughs, opens, unsubscribes etc. You can also track the value of linked Opportunities, Quotes, Invoices. Overall this gives you the ability to gauge the success of your marketing endeavours.
Using the Campaigns Module

As in other areas of the system, you can search from here, create new, and set up custom views.
Creating new Campaigns
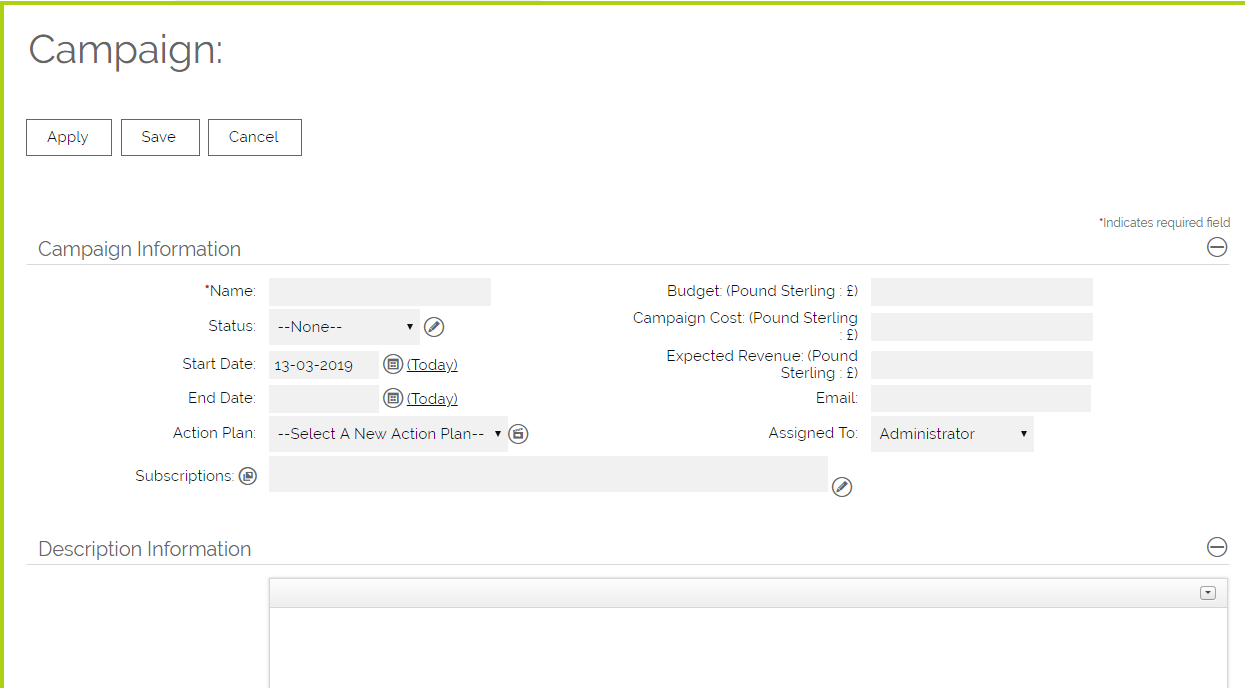
If you click "New" you are taken to an Edit screen where you can enter some basic details to describe the Campaign.
Explaining the Campaign Detail View

The Information tab will show you the basic Campaign information, and also a section which will help to show the results of the Campaign.
If you click the Leads, Contacts, Custom Contacts (if this module is enabled) or Companies tab, this will load into the Campaign detail view, a search screen, and a list of records that have been linked to the Campaign already. At the top of the screen you'll see the Keyword search, you can expand the search to display additional fields.. For example, if we click on Leads:
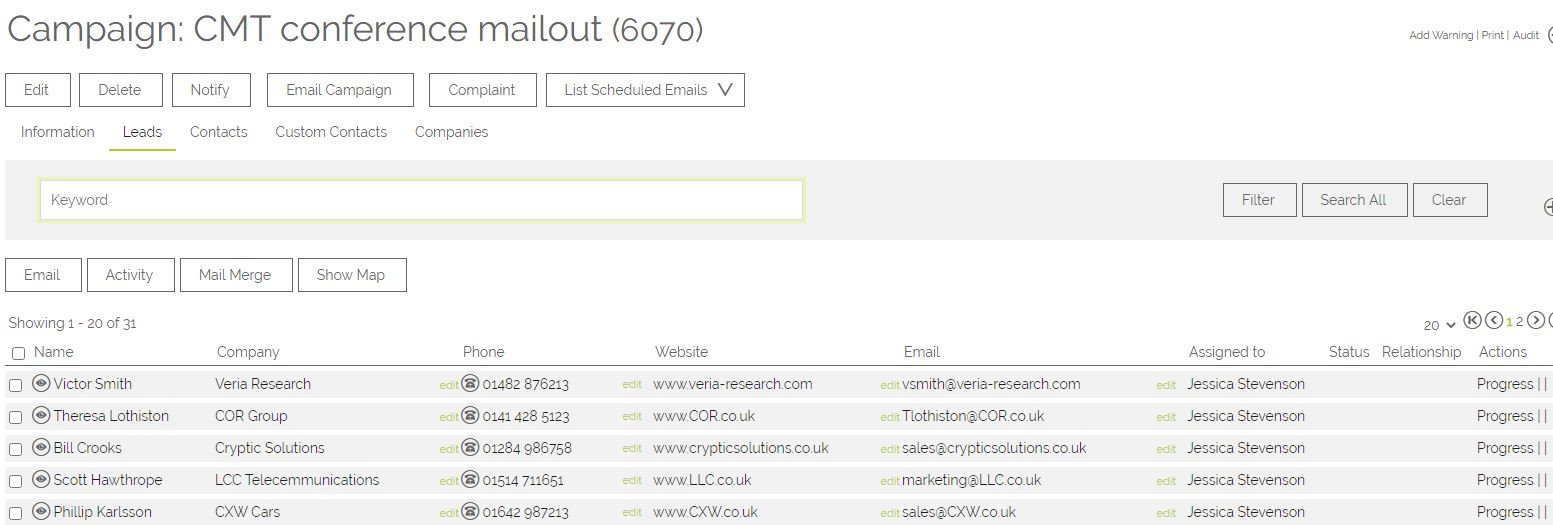
At the bottom of the screen, you can various action buttons that enable you to further manage your Campaign.

Adding Company / Contact / Lead records to the Campaign
There are various ways to add records to a Campaign
1. From the bottom of the module list view (search result) page.
At the bottom of the contact / company / lead search screen, there is a "Add to Campaign" button. You can add a number of records to the campaign in one go, by selecting the items by ticking them in the grid of search results and clicking this button.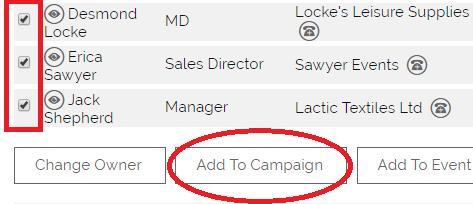 2. At the bottom of the list view (grey tool box at the bottom of the page)
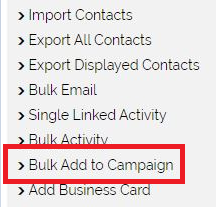
Similar to the function outlined above, using the Bulk Add to Campaign button will add ALL records from your current view to the Campaign.
3. From the record itself
On the record detail view, on the top row of buttons is an "Add to Campaign" button. This will allow you to add this individual record to a campaign.

4. From a Report
If you have created and run a Report that features the Leads, Contacts or Companies module, at the bottom of the Report results you will see buttons that will enable you to add the relevant records to a Campaign:

Regardless of which option you choose, you will be asked to pick the Campaign to add records to.
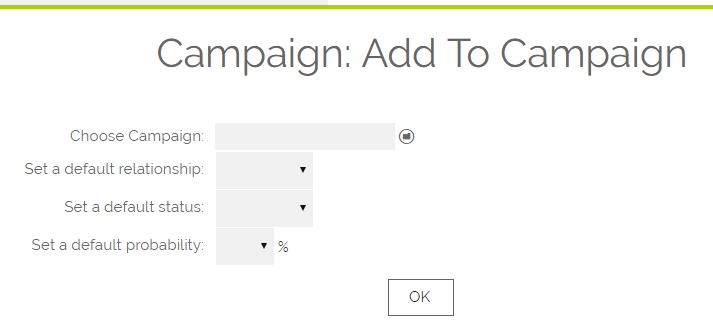
Simply click the folder icon on the right and then you can search and choose the Campaign to link the records to. There are a number of further fields that you can populate to make the data and Campaign information more useful.
Working with Campaign Lists
Once you have you records linked to the Campaign, there are a number of functions you can perform:
- Bulk email ALL items linked to the Campaign
- Bulk email Contacts / Leads / Companies
- Bulk Mail Merge all Contacts / Leads / Companies
- Bulk Activity all Contacts / Leads / Companies
- Remove items from list
Bulk Email ALL items linked to the campaign

If you click the Email Campaign button at the top of the Campaign, a new email is created which is linked to ALL items linked to the Campaign (all Leads, Companies and Contacts).
Bulk Email by Module
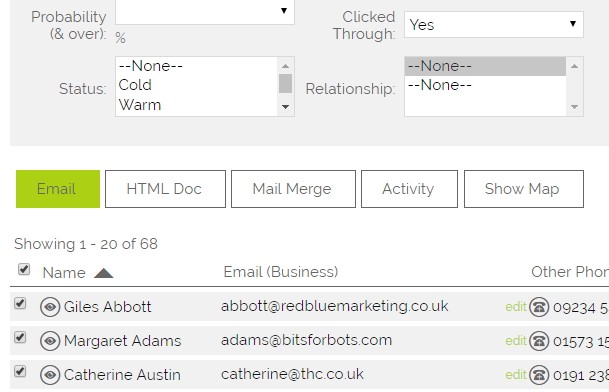
From the Lead / Contacts / Companies area of the Campaign, you also have a number of options. One of these is to send an email to selected records. This can be really useful when you are sending follow up emails and only want to email those Contacts, Leads, or Companies that have clicked through, for example. Tick the records you want to send an email to, and click the Email button that sits just above the records grid.
Bulk Activity / Mail Merge etc
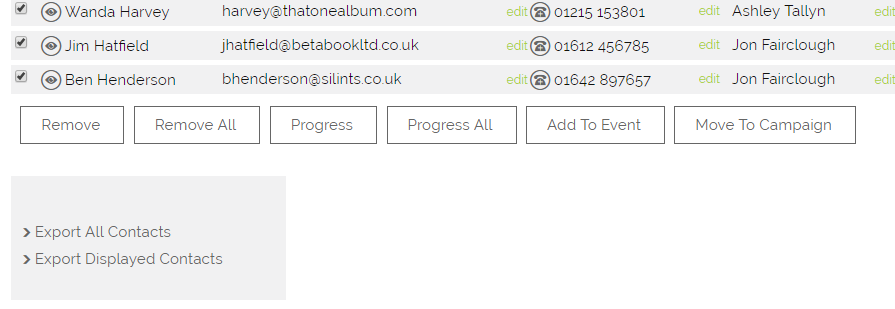
There are a number of other options available on the individual list view screens for Company, Contact and Lead are available on the Campaign list views as well. This allows you to hold a preset list of items, and use this to perform these functions. This includes creating:
- HTML Documents
- Mail Merge Documents
- Activities
Alternatively, you may want to add selected Contacts to an Event or move them to a different Campaign. You could also export into a CSV file.
Removing items from the list
At the bottom of the list views are two buttons
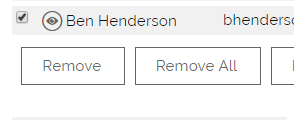
Remove will remove the items you have selected in the list.
Remove All will remove all of the items above, regardless of if you have selected them or not.
Progressing your Campaign
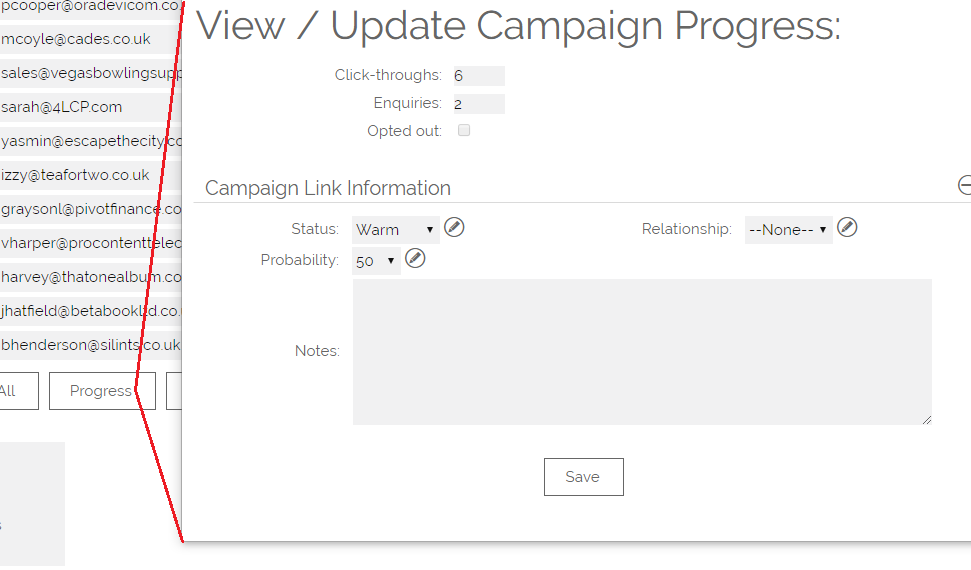
Progressing your records will allow you to view some basic Campaign status for these records and update the relationship between those individuals and the Campaign.
You can choose between selecting a few records and clicking Progress or clicking Progress All
Scheduling A Campaign
There are numerous studies which advise on when is the best time of day or which day of the week is likely to have the most impact when sending a mailout. In OpenCRM you are able to schedule the time and date to send an email - for example you may be working on your Campaign on a Sunday evening but want to send out the email on a Tuesday afternoon.
You can set this up by expanding the Email Information section at the top of the New Email screen:
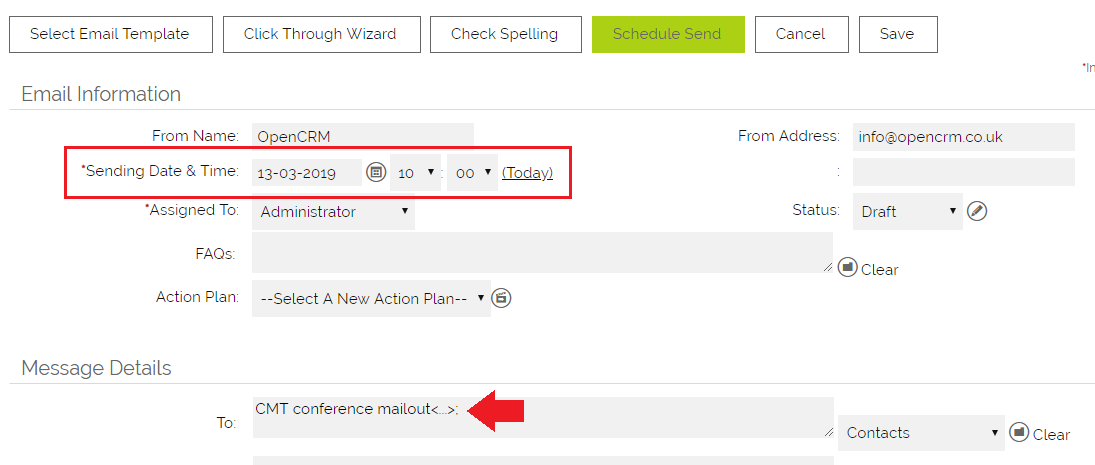
Here you can enter the required Sending Date & Time fields, then click Schedule Send. If you populate the From Name and From Address fields, that information will display on the sent email. If you leave this information blank and there is no From Name and From Address coded on the email template, the email will appear to be sent from the User doing the actual send.
You will notice that the "To" field shows the name of the Campaign, rather than the Contacts, Leads, or Companies. This is the way the system ensures that all records linked to this Campaign are parcelled up and included in the email.
Ensuring a Successful Delivery
There are various things you can do to ensure your Campaign is sent out successfully. Under the Description box, you will see the Send Confirmation box. When sending a bulk email, this will be unticked automatically, to prevent your OpenCRM sending you an email confirmation for EVERY email that you successfully send. Remember that OpenCRM sends all emails individually to prevent accidental spamming.
Tracking the results of a Campaign
From a campaign it is possible to track a number of statistics, including:
- The number of clickthroughs, enquiries, opens and unsubscribes from a Campaign email
- The total value of Opportunities / Quotes / Orders / Invoices generated from a Campaign
For more information about this, please see this FAQ.
Viewing the results on the Campaign
By coding the Campaign ID into your email template as described in the FAQ above, whenever a recipient clicks on a link in the email, the clickthrough is recorded against the campaign, and the count which can be shown on the "Results" panel is incremented. The same applies for enquiries.
Campaign Status
Statistics are not updated on Campaigns that are of a closed status. You should close a campaign once you are finished with it so that the statistics remain accurate and are not skewed by future email bounces.
You can change which of your Campaign Statuses count as being "closed" by going to Settings > Configuration > Additional Settings and clicking the Campaign option at the top. From there, you simply add the statuses, one per line.
Remember: any Campaign with a status in this list will not have statistics recorded against it.

Tracking Total value of Opportunities / Quotes / Orders / Invoices generated from a Campaign
When creating a new Opportunity / Quote / Order / Invoice, if you link the campaign to the new item (there is a field for Campaign on the edit screen in the Additional Information block), then the total value of all items linked is calculated and inserted in to the "Results" panel on the Campaign.

You can also create these items direct from the Campaign itself from the linked sub-tabs.
Seeing Results on a Lead/Contact/Company
Details of this and other Campaigns are now stored on the relevant Lead, Contact and Company record under the Details section:

Description of the fields on a Campaign Record
In the Campaign Information section you can set up targets for what you want to achieve with the Campaign.
Status – this is where you can keep track of the stage at which the Campaign currently is
Budget – enter the projected cost of the Campaign
Campaign Type – drop down menu to select the type of Campaign you are running
Email – Enter the email address for the campaign if you have set one up
Expected Revenue – Enter how much you expect the Campaign to generate
Actual Cost – Enter running costs of the Campaign as you incur them
Description – Enter a description of the Campaign
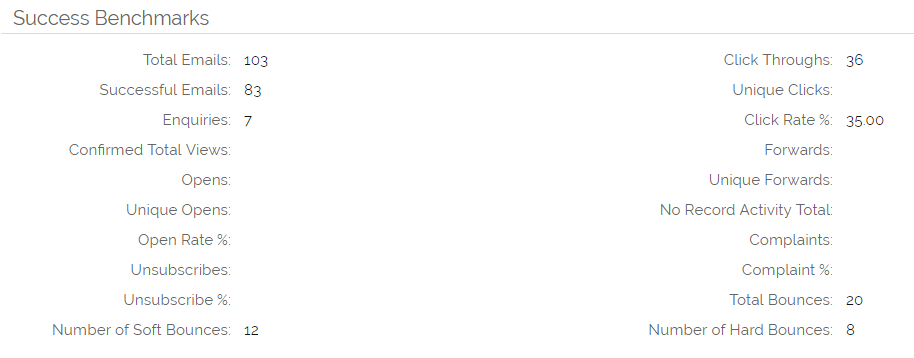
The Results section contains valuable information that is automatically generated for you:
Click Throughs – tells you how many times someone has clicked the hyperlinks in your Campaign email
Enquiries – As part of the click thru process you can present the browser with a web form. This form can display information that you already hold on the contact/company/lead record within OpenCRM (perhaps the browsers name and email address), it can be used to capture new information that will fill in the associated record or a mixture of both. [Our Professional Services team can help you set this up]. The Enquiries field shows the number of Web Form submissions have been made on this Campaign.
Total Opportunity Value – shows you the value of all Opportunities generated by the Campaign
Total Quote Value – shows you the value of all Quotes generated by the Campaign
Total Invoice Value – shows you the value of all Invoices generated by the Campaign
Number of Hard Bounces – shows you how many emails failed to deliver permanently
Number of Soft Bounces – shows you how many emails have been undelivered temporarily
For a description of hard and soft bounces, see this FAQ.
You have a number of Sub-Tabs beneath the Campaign record. These are:
Emails – this lists all email correspondence relating to the campaign
Pending – shows uncompleted activities related to the campaign
History – shows all completed activities related to the campaign
Opportunities – Shows all linked Opportunities
Quotes – Shows all linked Quotes
Sales Orders – shows all linked Sales Orders
Invoice – shows all linked Invoices
Duplicating A Campaign
The Duplicate function on Campaigns works slightly differently to Duplicating in other modules. This is primarily because the usual Duplication will replicate a single entity, whereas with a Campaign, you are likely to want to copy the audience across from one Campaign to another
To Duplicate a Campaign, go into the Campaign itself, where you will see the Duplicate button.

When you click this, you will see an interim screen
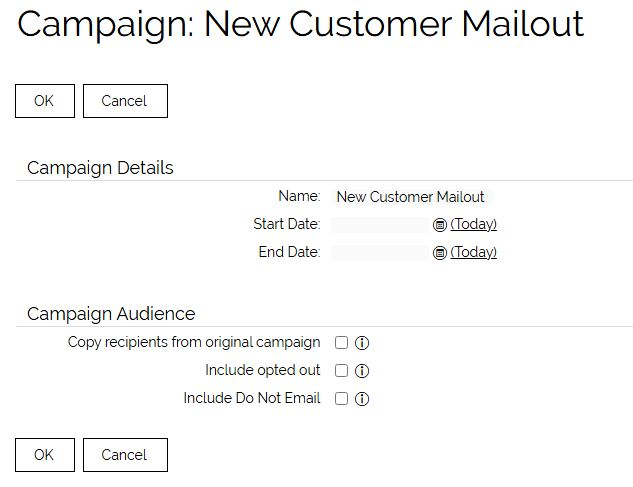
This page allows you to control the information around the new Campaign:
- Name - we recommend you update the name of the Campaign to avoid confusing it with the original
- Start Date - when you plan on starting the new Campaign
- End Date - when you plan on ending the new Campaign
- Copy recipients from original campaign - this will copy all Leads, Contacts and Companies across from the original Campaign, with the exception of anyone who has opted out from that campaign, or has unsubscribed from emailing (ie Do Not Email is ticked on their record)
- Include opted out - this allows you to also include anyone who has opted out into the new Campaign. They will remain opted out, and will therefore not receive emails from the new Campaign, unless you manually override their opt-out.
- Include Do Not Email - this allows you to also include anyone who is marked as Do Not Email into the new Campaign.
When you hit OK you'll see a pop-up asking you to confirm the details of the new Campaign
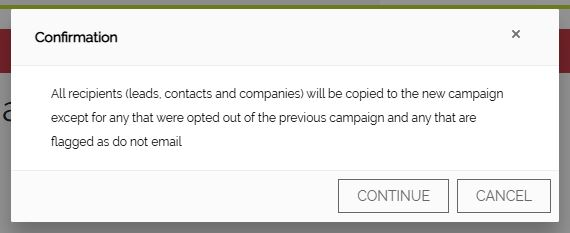
Click Continue to complete the process and be taken to your newly created Campaign. You can then manage the Campaign as you do with any other Campaign.
Important
If you need to cancel a scheduled email that has already started sending to a large group of people, simply change the status in the email to "Draft." You can read more about how this works and where to go to edit the email in this FAQ.
Need More Help?
If you have any questions, just start a Live Chat, "Click" on the Chat Icon in the lower right corner to talk with our support team.


