

As well as the standard fields in the modules of OpenCRM, you are able to add custom fields, hide other fields and re-arrange the fields to create a display that best suits the needs of you and your organisation.
Create a Custom Field
Let's create an example - you want to add a field named "Favourite Colour" to the Contact Information block on the Contacts record. To do this you need to:
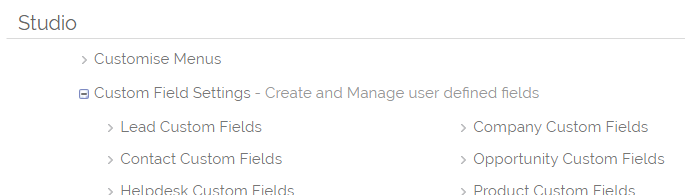
- Go into Settings, expand the Custom Field Settings in Studio and click on Contact Custom Fields.
- From there you need to select the Create Custom Field Button, and you can now create the Custom field required.
- There are many different Field Typesyou can use, using the picklist on the left side you can select whether you want to create a text field, or text area, or check box, or picklist, or date field, to give you just a few examples. you need to be sure which type of field you want to create as you cannot edit the field type once the field is saved. In this example, we'll create a Picklist Field for the Contacts module where we can pick their Favourite Colour
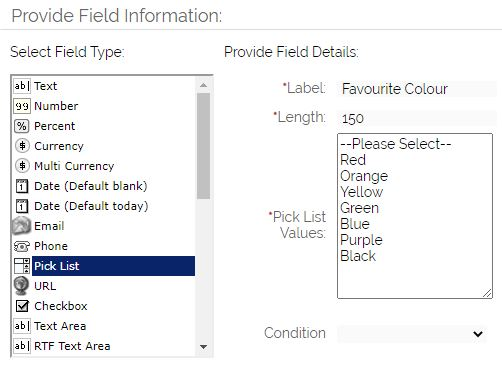
- You then need to add the values to your picklist, and specify the field length (number of characters permitted in this field). Then Save the new field.
The next thing to do is to move the new field to where you wish to have it showing. - To do this you need to go back into Settings and go to the Studio block. Click the Screen Design link and then select the correct module, i.e. Contact Settings, for this example:

- Here you can locate the new Custom Field and you can edit the Sequence and Block to place the field where you want it to go (see below for further guidance).

Screen Design
There are two elements to placing your new custom field (or moving an existing field):
- Block - Editing the block number will move the field in and out of the major blocks on the page.
- Sequence - Editing the sequence will set where the field appears within the block.
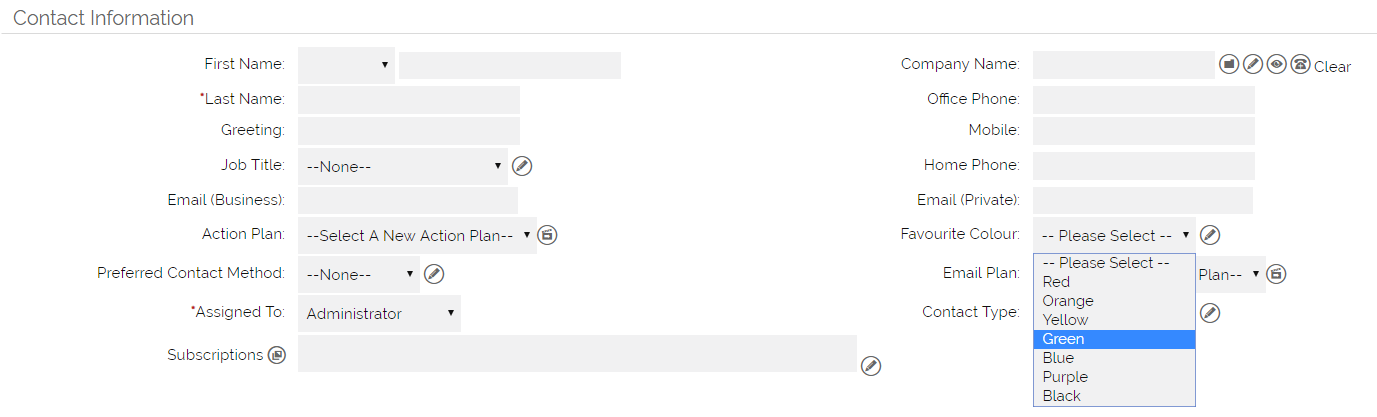
Having chosen to place the Custom Field at the end of the Contact Information block, you need to click on Update to save the changes.
The next time you return to the Contact Edit screen, you are able to see the new field and can select from the values that we entered in the picklist.
Hiding Fields
If you want to hide a field, please refer our FAQ on how to hide fields.
Renaming a Custom Field
Open the custom field list for the module you are interested in changing the field names for. From here you can click the edit button beside the name of the field to give it a new name.

Then just click the "save" link to save your change.
Different types of custom field
Field Type | What does it do? |
| Text | A simple text field, you can set the max number of characters allowed. |
| Number | A simple number field, you can set how many decimal places it will show. |
| Percent | A number field that will display as a percentage. |
| Currency | A number field that will display your default currency symbol. |
| Multi Currency | This will create up to 5 number fields, displaying the various currency symbols you have set up |
| Date (Default blank) | A date field that defaults to blank |
| Date (Default today) | A date field that defaults to today's date |
| A field for holding additional email addresses | |
| Phone | A field for holding additional telephone numbers |
| Picklist | Also known as a "dropdown" field, where you can set a number of pre-written values in a list for your users to select from |
| URL | A field for holding web addresses |
| Checkbox | A single tickbox field |
| Text Area | A field for holding plain text, i.e. no formatting |
| RTF Text Area | Simila to the Text area, but this field type will allow you format the text that appears |
| Header | These custom headers can be useful for breaking up your page, but remember that you cannot collapse them |
| Question - Script | A static area of text on the screen, useful for prompting your users to ask questions or remember particular details |
| Spacer | A blank space that can be useful when organising your fields on screen. |
| Multi-Select | A series of tick boxes so your users can select multiple options. |
| Popup multi select | A list of options where your users can select multiple options - displays in a new window (just like when you select a user from a notification window) |
| Associated Picklist | A little difficult to describe, but you can change the values of one picklist based on the selection of a different picklist. |
| Contact Selector | A field for linking a Contact to your record |
| Company Selector | A field for linking a Company to your record |
| User Drop Down | A field where you will be able to select one of your users (will not affect the Assigned to user) - the default user is the first in your list |
| User Lookup (Default None) | The same as the User Drop Down, but there is no user selected by default |
| Team Picker | A field where you will be able to select different Teams |
| Context Picklist | Similar to the Associated Picklist, but this allows you to use a system field for the initial context |
| Calculation General | A field where you can perform simple calculations. |
| Calculation Currency | A field where you can perform simple calculations involving currency. |
| Calculation Date | A field where you can perform simple calculations involving dates. |
| Image Upload | A field for storing an image file. |
| Calculation Multi-Currency | A field where you can perform simple calculations resulting in up to 5 fields in your different currencies. |
| Password Field | A field that will display as a series of starts (****) when in Consult. |
| Encrypted Field | A field that is encrypted in the backend of your system |
Need More Help?
If you have any questions, just start a Live Chat, "Click" on the Chat Icon in the lower right corner to talk with our support team.