

What is the Customer Portal?
The customer portal allows customers access to information regarding their details on your system. They will be able to login and view their Contact details, as well as any linked Documents, HelpDesk Tickets, Sales Orders, Invoices, and any other parts of the system you would like them to be able to view. They can also create new HelpDesk Tickets and eSign Sales Orders via the Customer Portal.
Modules that the customer can access*:
* My Details - self service details from your OpenCRM system (Lead, Contact and Company)
* Registered user access - create links to information on your website that require user registration
* Knowledgebase - Search and display FAQs direct from OpenCRM
* Helpdesk - Create and Manage Tickets online - includes comments and file attachments.
* Documents - Private and Public documents
* Invoices - Display Paid and Outstanding invoices for the linked Company
* Quotations - List Quotations that are Open or Closed linked to the Contact
* Sales Orders - List Sales Orders requiring action with eSign facilities and also display closed sales Orders
* Projects - List Projects that are Open and Closed and allow interaction with the Project including Comments and Attachments
* Assets - List Assets that the Contact and their Company are linked to
*Note that you can restrict access to only the specific modules that you would like them to have access to. So for example, if you do not use HelpDesk you can deselect this and it will not be available.
This FAQ is going to walk you through:
1. Installing the Customer Portal
2. Giving your Contacts or Leads access to the Portal (so they can manage their details and view other records)
a. Automation options
b. Forgotten usernames and passwords
3. A general overview of what you can do with the Portal, including:
a. Managing personal information
b. Giving your Contacts access to other records
c. Viewing and Logging Tickets
d. Uploading and viewing Documents
e. Downloading and viewing Invoices, Quotes, and Sales Orders (information about eSigning is in another dedicated FAQ)
f. Viewing and commenting on ongoing Projects
g. Managing your FAQ library
How do I install a Customer Portal for OpenCRM?
Please note - before you install your customer portal - please make sure that you have uploaded your logo to OpenCRM and that your Company Information is configured under the Settings section. The logo and your company information (address, phone number etc) are copied into the portal configuration as part of the installation)
Go to Settings and look under the Configuration block. There should be a link there called Install Customer Portal. Clicking this will install your portal.
If you are not sure, please contact OpenCRM via support (support@opencrm.co.uk) or your Account Manager.
How do I give a Contact or Lead access to my Portal, and select which modules/records they will have access to?
A pre-requisite to enabling your Customers (Contacts) to access your online portal is that their contact records must be populated with an email address. Without this, log-in attempts will fail.
To set up a Contact in your OpenCRM system, so that they can get access to your Online Portal you would need to follow these steps;
- Go to the Contact that you wish to give access to, and edit the record
- Scroll down the page and expand (if it is not already) the Customer Portal Information panel

- There are a number of fields that require data, these are explained below;
- Portal User = This is the field that allows or disallows access to the Portal - this is a simple way to cease someone's access, by deselecting this field, obviously, the check box has to be set for the Contact to login on to the portal.
- Support Start and End date = The period that this user will be able to login to the portal, regardless of the Active - Portal User tick box.
- Username = the username that the Contact will use to login
- Password = The Initial Password that you set for this user to gain access to the Portal
- Can eSign = With this check box selected the Contact will be able to Electronically Sign Sales Orders that are generated within your OpenCRM system
- PIN Reset = As part of the eSign process an additional level of security includes the requirement for a Contact to have a specific PIN that is used as confirmation when they eSign any Sales Order, this check box allows the Contact to reset that PIN whilst they are logged into the portal
- Portal Components = There are a number of modules that are standard within the Online Portal
For further information regarding the eSign process take a look at This FAQ
Automating Portal User Creation and Notification
We have a number of automation options for creating Portal Users in OpenCRM.
You can find these settings by going to Settings > Integration > Configure your Customer Portal
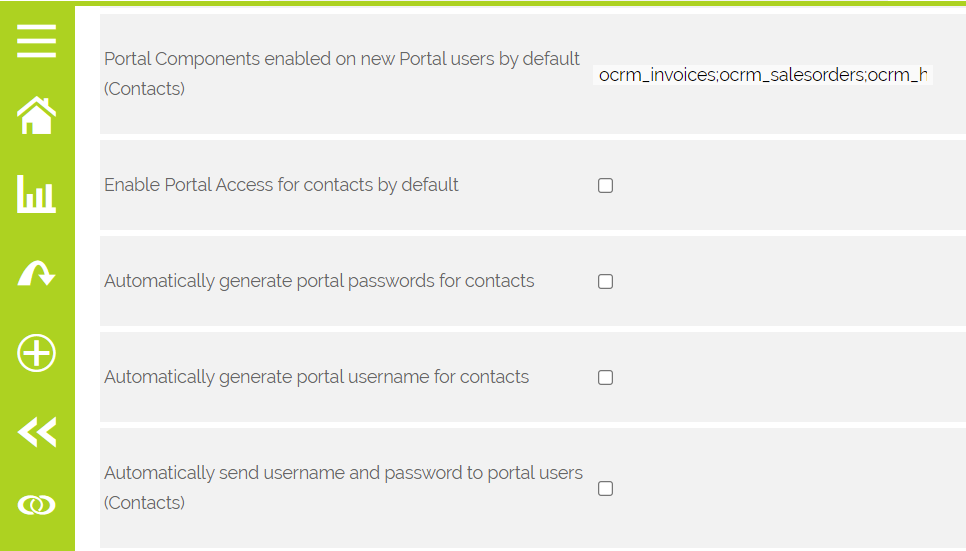
You can pick and choose these settings to a certain extent, deciding:
- Which areas of the portal the users can access by default
- Whether OpenCRM should enable access by default (but no login information will be set if just this is enabled)
- Automatically generate a username (email) and/or password for your Contacts.
- And whether to automatically sent the username/password to portal users (using the email templates defined on this page -- different settings for Contacts and Leads)
Important: the default username will always be the Contact or Lead's email address.
These settings are available for both Contacts and Leads.
Is there a Remember Me option?
If you want to give your portal users the option to remember their log-in, you will need to contact our support. Please note this is a global setting that will apply to ALL portal users.
How Username/ Password resets work?
Your users will be able to request their Username and/ or reset their Password from your portal login page.
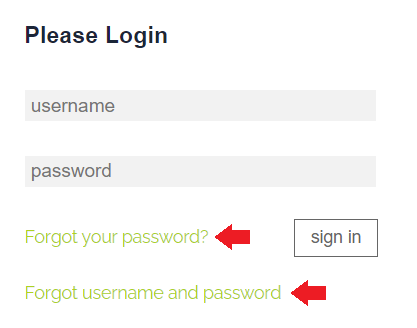
When they request either, they will be asked to put in their email address or username. Once they click submit, they will be presented with some text, which you can customise (also from the settings page: Settings > Integrations > Configure your customer portal).
Here is what your users see: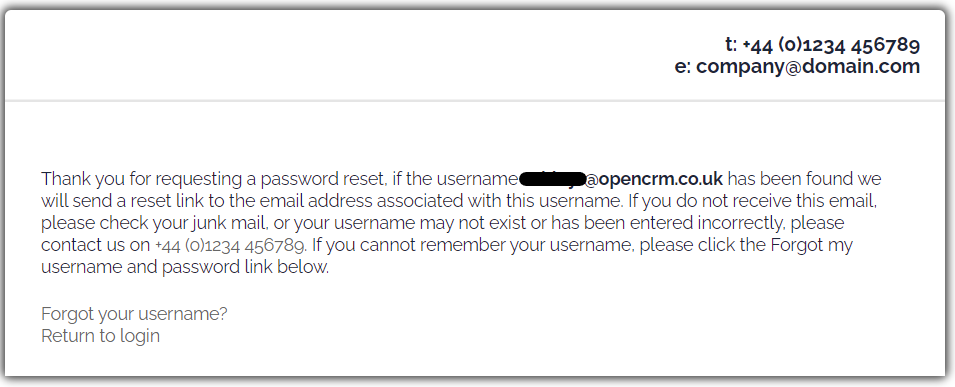
And here are the settings where you can add your own text:
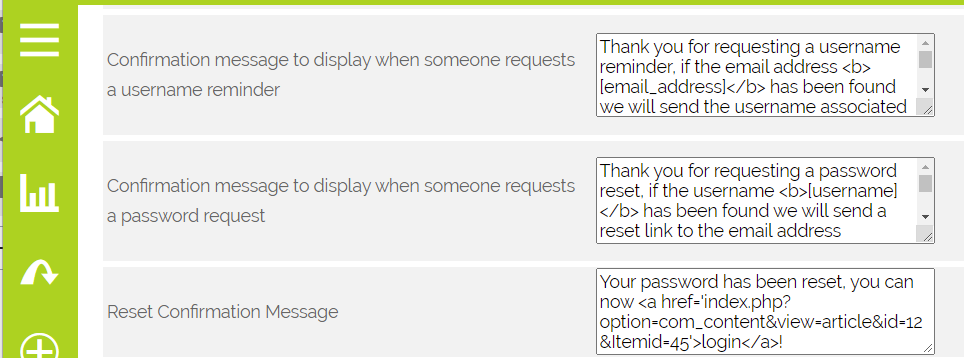
Important: Because these password and username resets are based off the Contact and/or Lead's email address, no two portal users (Contacts or Leads) in OpenCRM can have the same email address.
How does it work?
Once the customer has been granted access and the Portal has been installed you will be able to access it by going to http://yourcompany.opencrm.co.uk/Portal (insert your company details) and will be greeted with the screen below: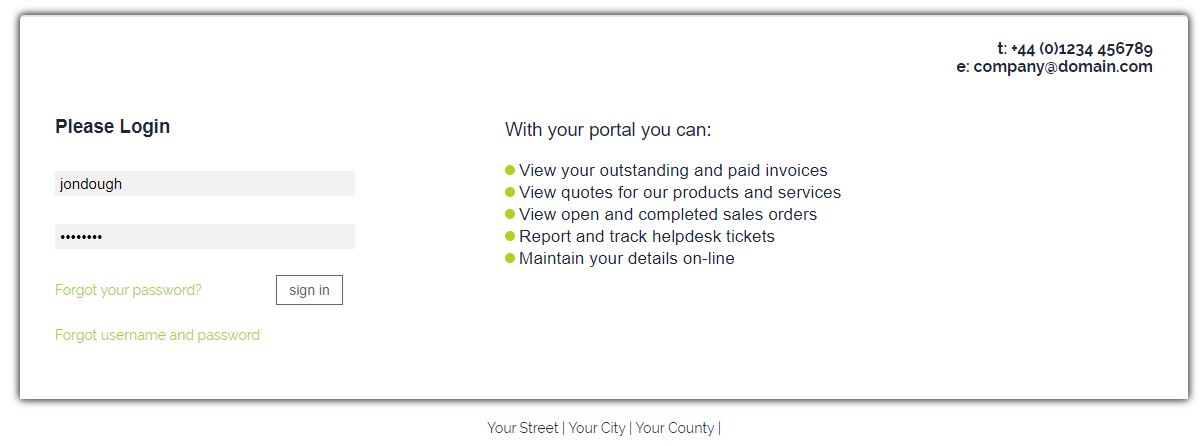 This displays the login page requesting the username and passwords - there is also a LOGIN button on the top menu of the portal. The logo and other information on the page will be populated with your own details, such as their address, telephone and email address, when the Customer Portal is first set up for you.
Once logged in the customer is taken to a landing page that displays a list of the Modules that they have access to. You can also set the landing page to be a Welcome Page that advertises products or services that may be of interest to your clients.
The Contact can select the module that they wish to see information on, this will take them to a screen that displays a list of items. The default is set to be their details page.
My Details
This is where the customer can update their Contact and Company information.
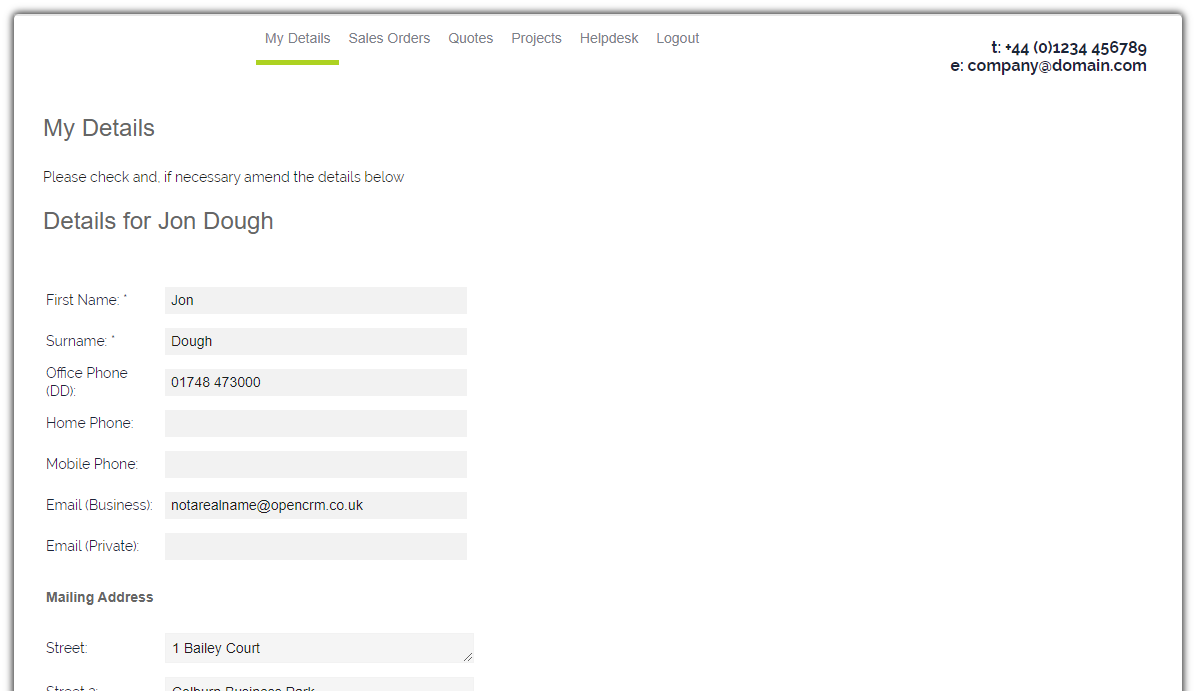
Can I control which fields are displayed on the My Details page?
If you got to OpenCRM Settings > Integrations > Configure your customer portal you will find options to adjust the fields visible relating to Contact, Company and Lead records. Please note that this is currently restricted to hiding fields available in the Portal, and not adding other fields to the Portal.

If you go into one of the Portal fields sections, you can use the slider to toggle fields display to on or off. Any fields without a slider cannot be hidden.
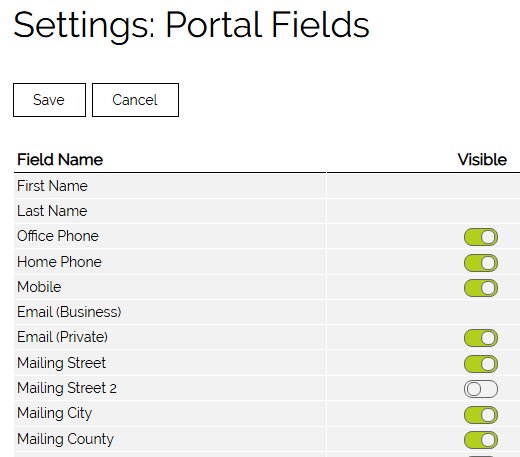
If the contact has a linked company, you will also be able to give them access to update the linked company information. If they are not linked to a company, this section won't show at all.
How do I get records to show on the Portal?
Basically, any record that is linked to your Contact and set to display on the Portal will appear.
So the first step is to make sure your new record is linked to your Contact, so edit the record, and select the folder icon next to the Contact Name field

This will pop a screen that allows you to search and select a Contact. When you select the Contact you will see their name entered into the Contact Name field. Now they are linked.
From here, you need to make sure your record is set to display on the Portal. This is the kind of thing you are looking for, but every module will be slightly different:

Helpdesk
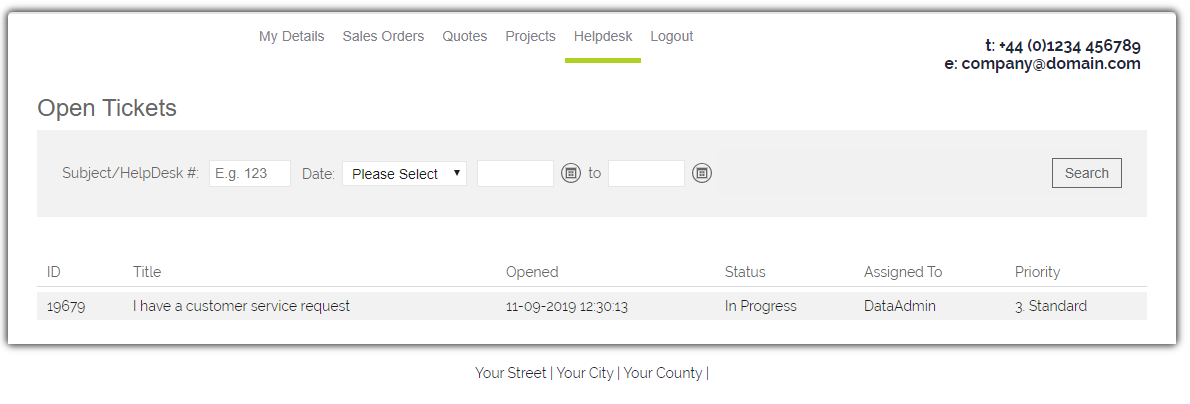
If the Helpdesk feature has been set up on your system this is where a customer can come to:
* Log new tickets
* Check the status of all existing tickets that relate to their Company
* Update tickets by adding comments or documents
* Access any FAQs you have related to support
* Request remote assistance (this will be a link to your own remote assistance set up)
Please note that by default, a user with access to the HelpDesk module of the portal is able to see all tickets logged by them and any other member of their company. You can change this by enabling the additional setting "Only Authorised Contacts can view all tickets at their company on the portal. Standard contacts can only view their own.". With this enabled, you can then enable individual contacts access to all company tickets by ticking the "Authorised User" tickbox when editing the link between the company and the contact.
If you would like a quick overview of the Helpdesk feature in OpenCRM please take a look at this FAQ
If you want to add any additional fields to the Helpdesk Search panel on the Portal (for example, searching on tickets relating to a particular Service you provide) then please contact your Account Manager more details.
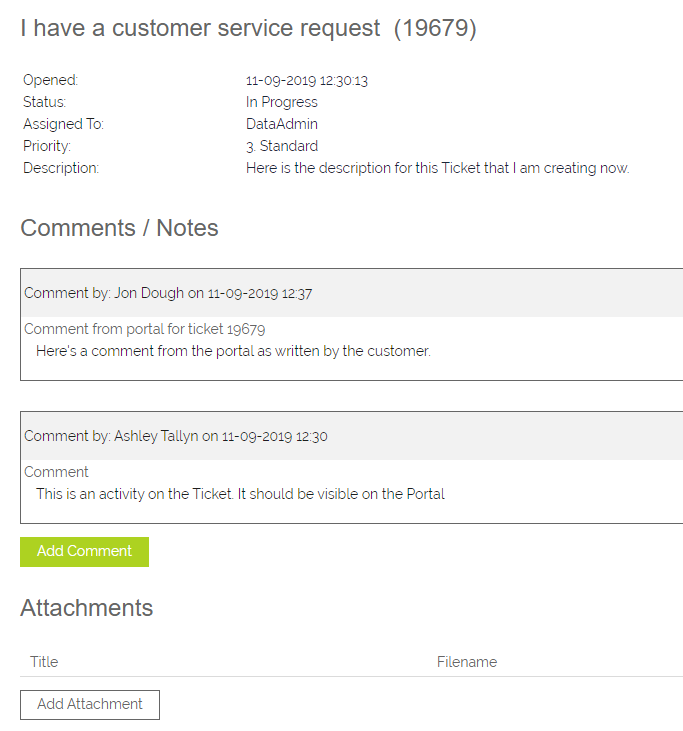
Assets
It is possible to enable an Assets module on the OpenCRM customer portal which will allow your customers to view assets they/their company is linked to. Additionally, the customer can raise Tickets relating to these assets.
Documents
Your customers are able to upload files to your Customer Portal that will appear as Documents in your OpenCRM system.
To upload a document via the portal, your customers will simply need to select the Documents tab and then click on Upload Document. From here, they can fill in the document title as well as a description before uploading their file.
Once they click the Upload button, the Document will be uploaded to OpenCRM and will be linked to the Contact who uploaded it and their primary Company (if the Contact is linked to one). You will be able to see this by going to the Contact module in OpenCRM and selecting the Document sub-tab at the bottom of the page, this will show you a list of documents.
When a document has been uploaded, a notification will be sent to the user-specified within the settings alerting them that a new document has been uploaded via the Portal. This FAQ will walk you through those settings.
Documents can be uploaded/attached to Projects, HelpDesk tickets and via the Document section within the portal. Users will see a confirmation if their file has been successfully uploaded, if an error occurs with the connection or the file is empty the user will see an error message advising them to try again and to contact you if the issue persists.
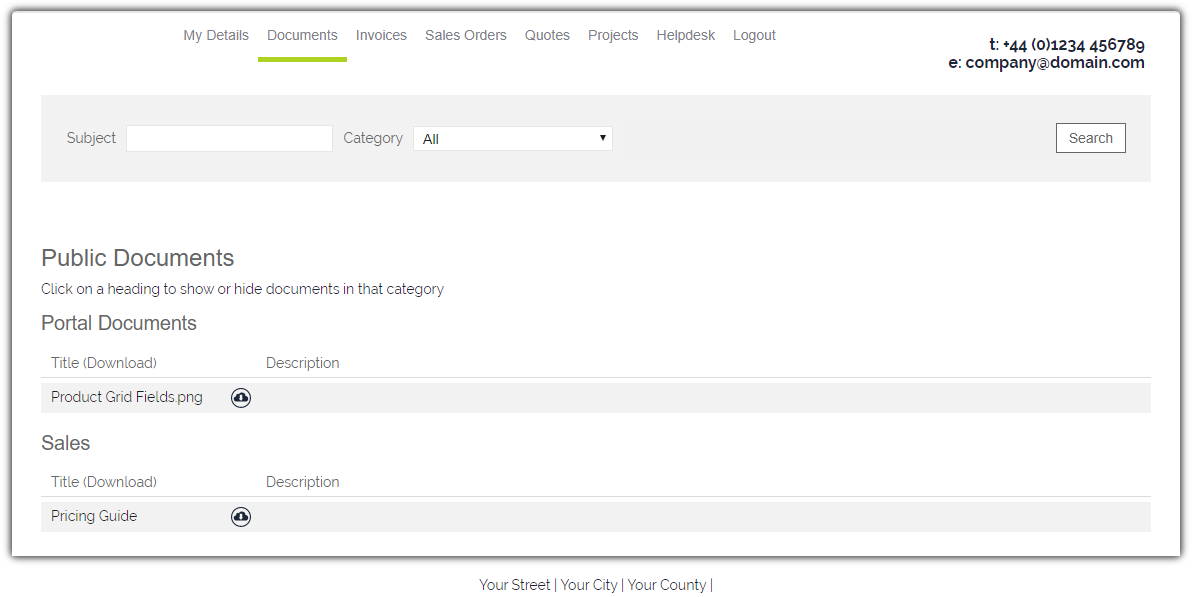
Here is where any document related to a customer can be shown. This could be a document dealing with an invoice, a project, a ticket or any other document that might be connected to their contact record. There are 3 folders that they can have access to which will filter what they can see. These are:
Public Documents - These are documents that have been marked in your OpenCRM system with Show On Portal and Customer Portal Public Document ticked. Records are displayed under folders and MUST have a "Folder" value in order to display.
Private Documents - These are documents that have been marked in OpenCRM with the Show On Portal tick box selected and have been linked to this Contact using the Contact Sub-tab. Records are displayed under folders and MUST have a Folder value in order to display.
My Documents - This shows any documents flagged as Show On Portal linked to a Project record (via the Related To field on the Document) which the Contact is in turn linked via the Contact sub-tab. The documents linked via a Project will be organised under headings with the Project Name. Items DO NOT need to have a Folder set to display here.
Projects - By creating a Project flagged as Show on Portal and Show Documents on Portal, you can display documents linked to the project on the portal provided the documents are also flagged as shown on the portal. Documents will be listed on the project and any attachments will be available to download. You may wish to use a Project purely as a way to organise and display documents within the portal, see My Documents above, by setting the Project type to "Documents" the project will not appear in the Projects section but the documents attached can still be shown under My Documents.
Thumbnails - You can enable a "Portal Thumbnail" field on Documents via Settings -> Default Organisation Field Access. This is an image upload field any image added here will appear to the left of the document if it is set to be displayed in the portal. If an image is not uploaded then a placeholder file icon will be displayed instead.
Invoices
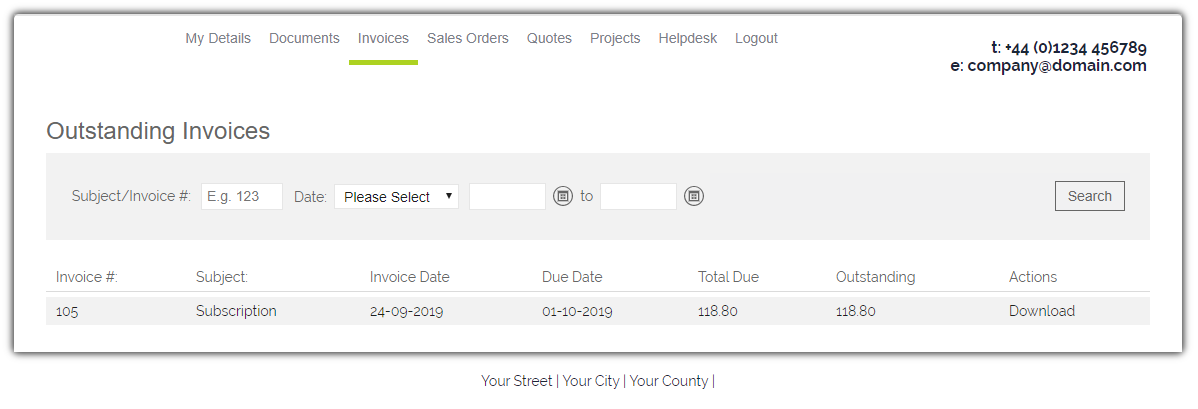
Your customer will be able to track any invoices they have with you:
- Outstanding Invoice - Any outstanding Invoices that still need payment
- Paid Invoice - All invoices that the customer has already paid
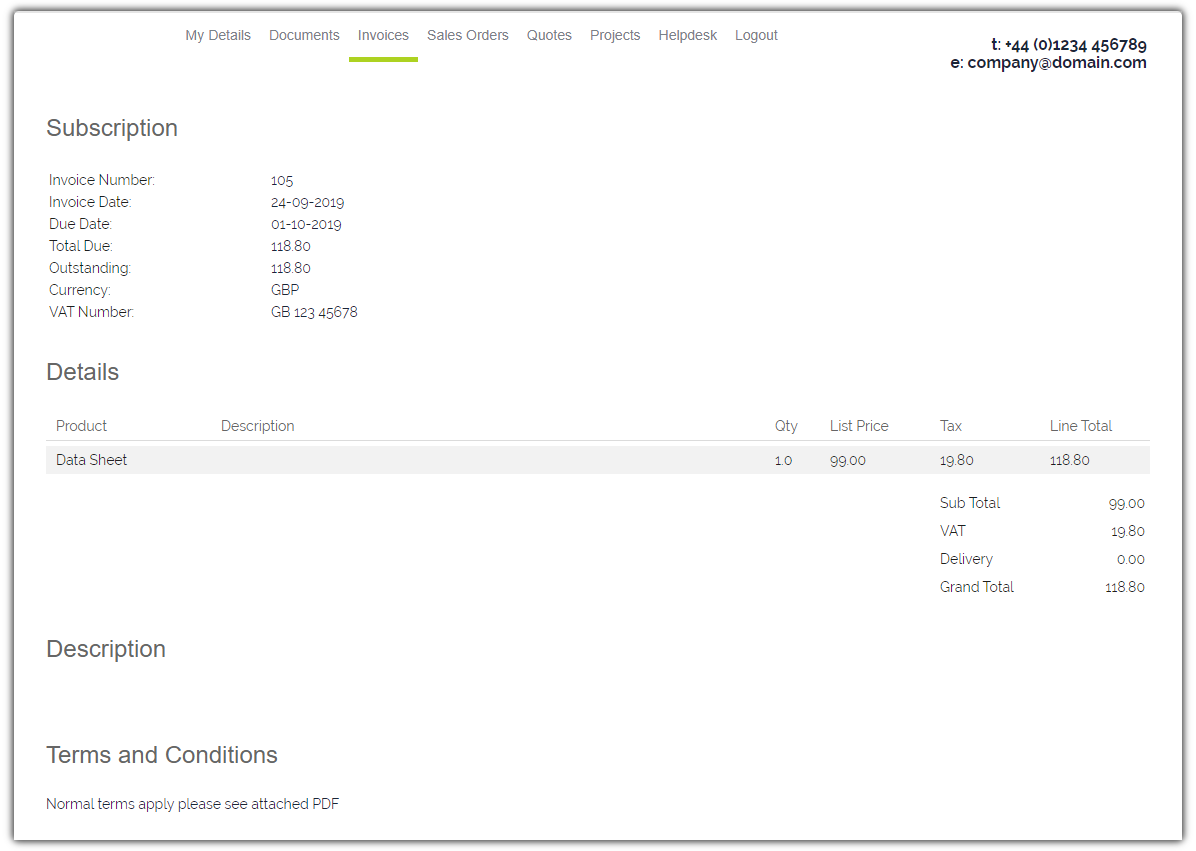
By selecting the invoice they will be able to get more information regarding that invoice, see the terms and conditions relating to it and any additional details linked to that invoice's record.
You can set the Invoices' assigned users to be notified when a Contact has viewed or downloaded an Invoice from the Portal. To do this:
1. Go to Settings > Configuration > Additional Settings
2. Click on Invoice Settings
3. Tick to indicate which notifications you would like to receive
4. Click Save.

Quotes
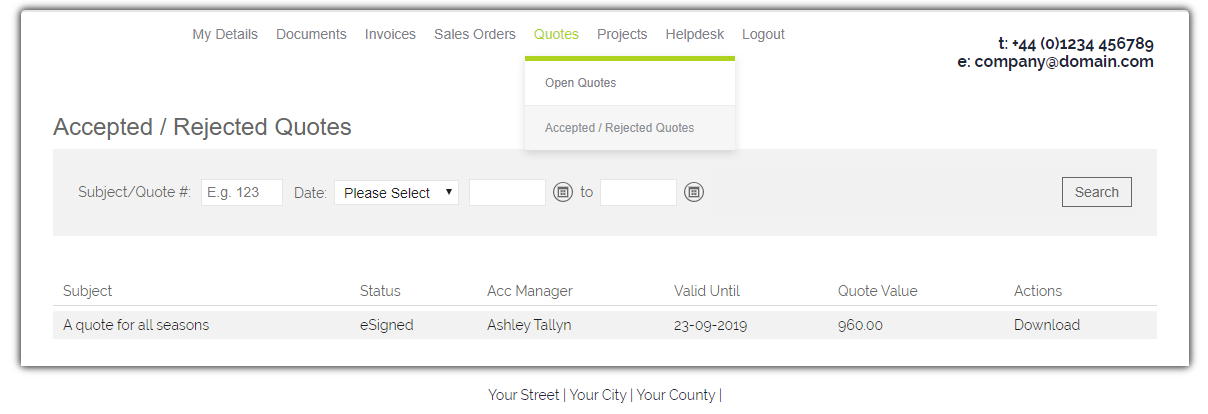
Much like invoices, this is where the customer can go to view:
- Open quotes - Lists any quote that is still open and waiting for confirmation
- Accepted or Rejected Quotes - Lists Previous quotes that have either been accepted or rejected
They can then select a particular Quote and then view more detailed information regarding that quote.
You can set the Quotes' assigned users to be notified when a Contact has viewed or downloaded a Quote from the Portal. To do this:
1. Go to Settings > Configuration > Additional Settings
2. Click on Quote Settings (the screenshot shows Invoices, but the settings will be the same.)
3. Tick to indicate which notifications you would like to receive
4. Click Save.

Sales Orders
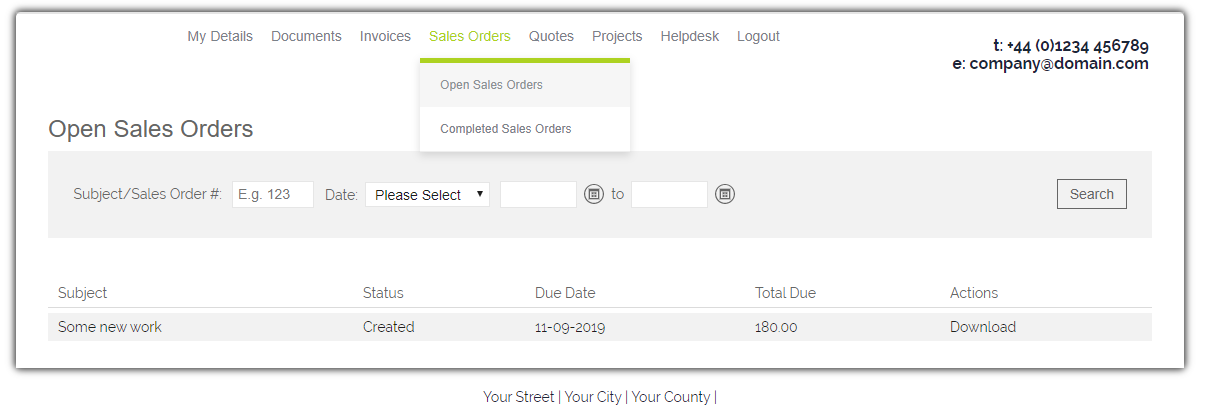
When the customer selects Sales Order they will have the option to view:
- Open Sales Orders - View open Sales Orders and then be able to select those that they would like to E-sign and process
- Completed Sales Orders - View a list of completed Sales Orders with the option to view more detail on each Sale Order by selecting it from the list
- E-sign a Sales Order - This is an option for customers to sign Sales Orders electronically. For more information on E-signing please use this LINK
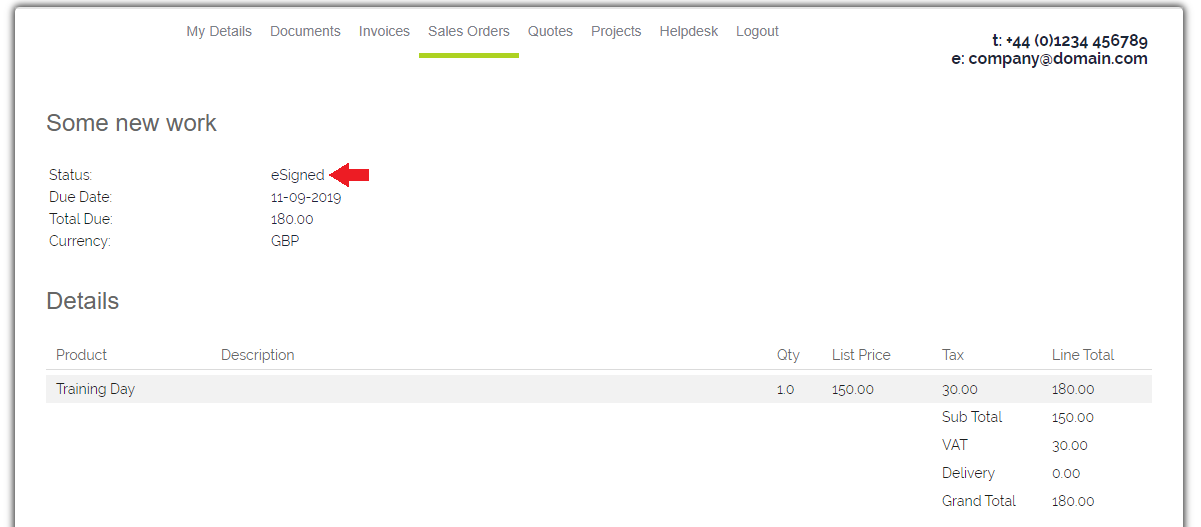
Once all the information is there and the customer selects the Open Sales Order they will be able to see the details of that Order.
Here they will be able to Approve the order and e-sign for it. When the customer clicks on the Approve button a small pop-up will show asking for their PIN number:
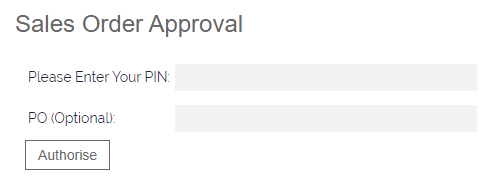
This will then move the Sales Order from Open to Completed and change the status to eSigned:
Note: If the customer does not have the ability to e-sign they will not be asked any of the above nor be able to approve the Sales Order. They will however be able to view the Sales Order.
You can set the Sales Orders' assigned users to be notified when a Contact has viewed or downloaded a Sales Order from the Portal. To do this:
1. Go to Settings > Configuration > Additional Settings
2. Click on Sales Order Settings (the screenshot shows Invoices, but the settings will be the same.)
3. Tick to indicate which notifications you would like to receive
4. Click Save.

Projects
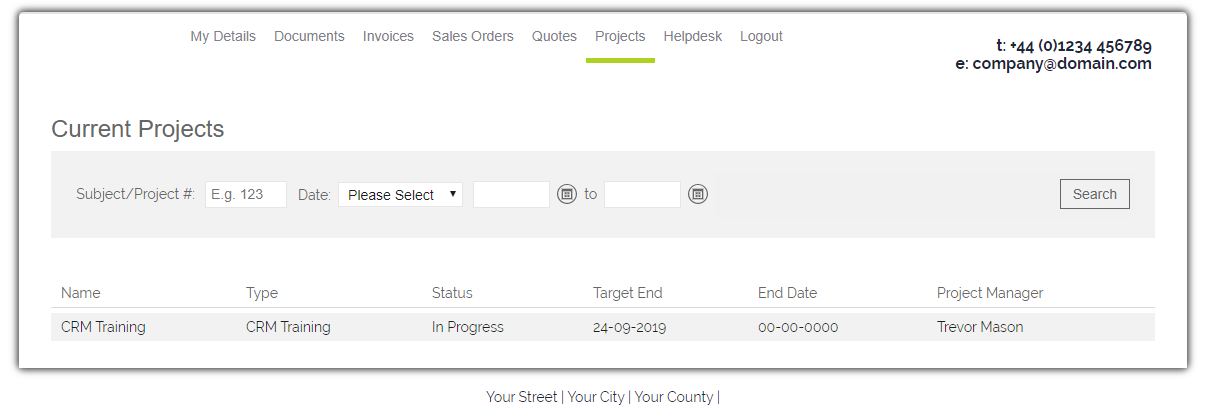
Under Projects the customer will be able to view:
- Current Projects - Any project that is still being worked on
- Completed Projects - All projects that have been completed
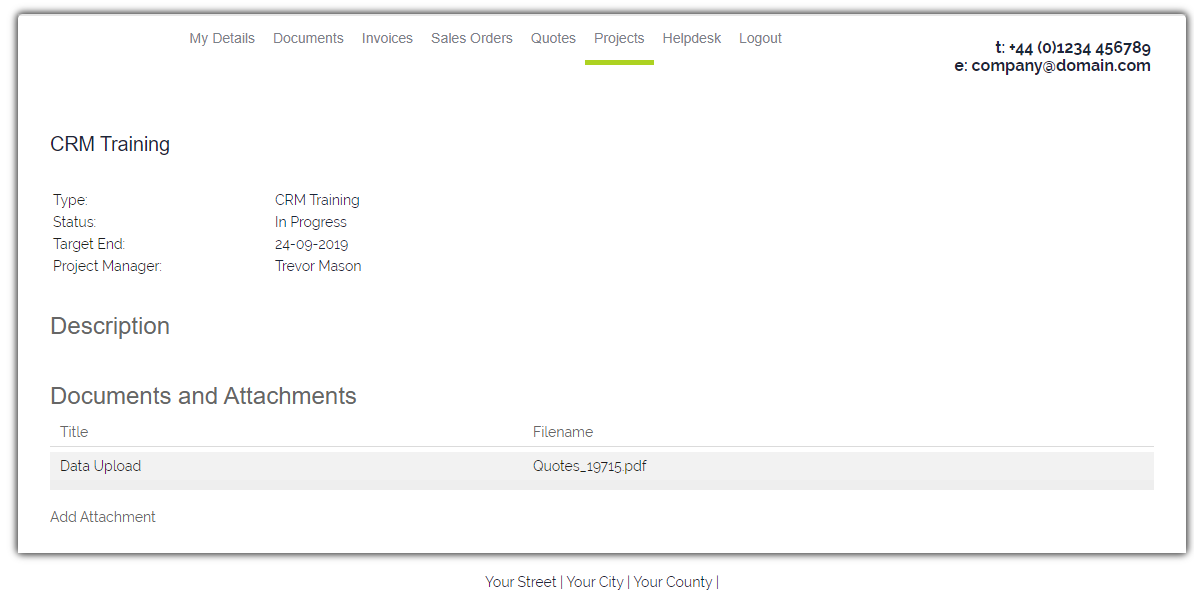
When the customer views a Project they will be able to see:
- Who their Project Manager is
- When the project should end
- What the current status is
- Any documents that are related to the Project
They will also have the ability to add additional documents to the Project if needed.
Search Enhancements
You have some advanced Search functionality for the Quotes, Sales Orders, Invoices, Projects and Helpdesk modules on the Portal. The search panel sits at the top of each module, just below the module selector, and looks like this:
Within each module, you are able to search on the Subject or ID of a record, the status, and date ranges (To/ From) for selected date fields available within each module (e.g. in Invoices you can search for Created Date, Due Date, Paid Date and Invoice Date). When searching on Date, you need to specify which Date field you are searching on, and use a combination of either the From and To fields, or just the From field, or just the To field.
The Status search is multi-select, allowing you to display records of more than one status within a list. You can do this by clicking into the Status field and selecting all values you wish to search on:
FAQs or Knowledgebase
This module can be used to store internal procedural documents. It can also, using the customer portal, allow you to post Knowledgebase articles that can be made available to your customer base.
To Create a New FAQ
1. Navigate to the FAQ module and click New FAQ.
2. At the top of the screen you have a number of pick-list fields.
You can select:
- The Category and Product to which the FAQ relates (if applicable)
- Your username will be added as the ‘Assigned to’ field automatically.
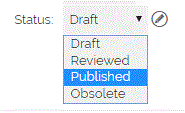
- Select a Status for the FAQ.
- You can attach documents or a video (see FAQ) to the FAQ using the fields provided.
3. Specify the question being addressed. This is the field most people will search for, so try to write it with this in mind.
4. Use the answer field to write your solution and/or a step-by-step guide.
5. When you are satisfied with your FAQ click Save.
To Add Your FAQ to the Portal
To make your FAQs available to your customers, you simply a matter of marking your FAQ as ‘Published’ in the status field and click Save. This will display your FAQ to those of your contacts with portal access.
When giving one of your contacts portal access, to ensure that they can view FAQs, simply tick the box on their record.
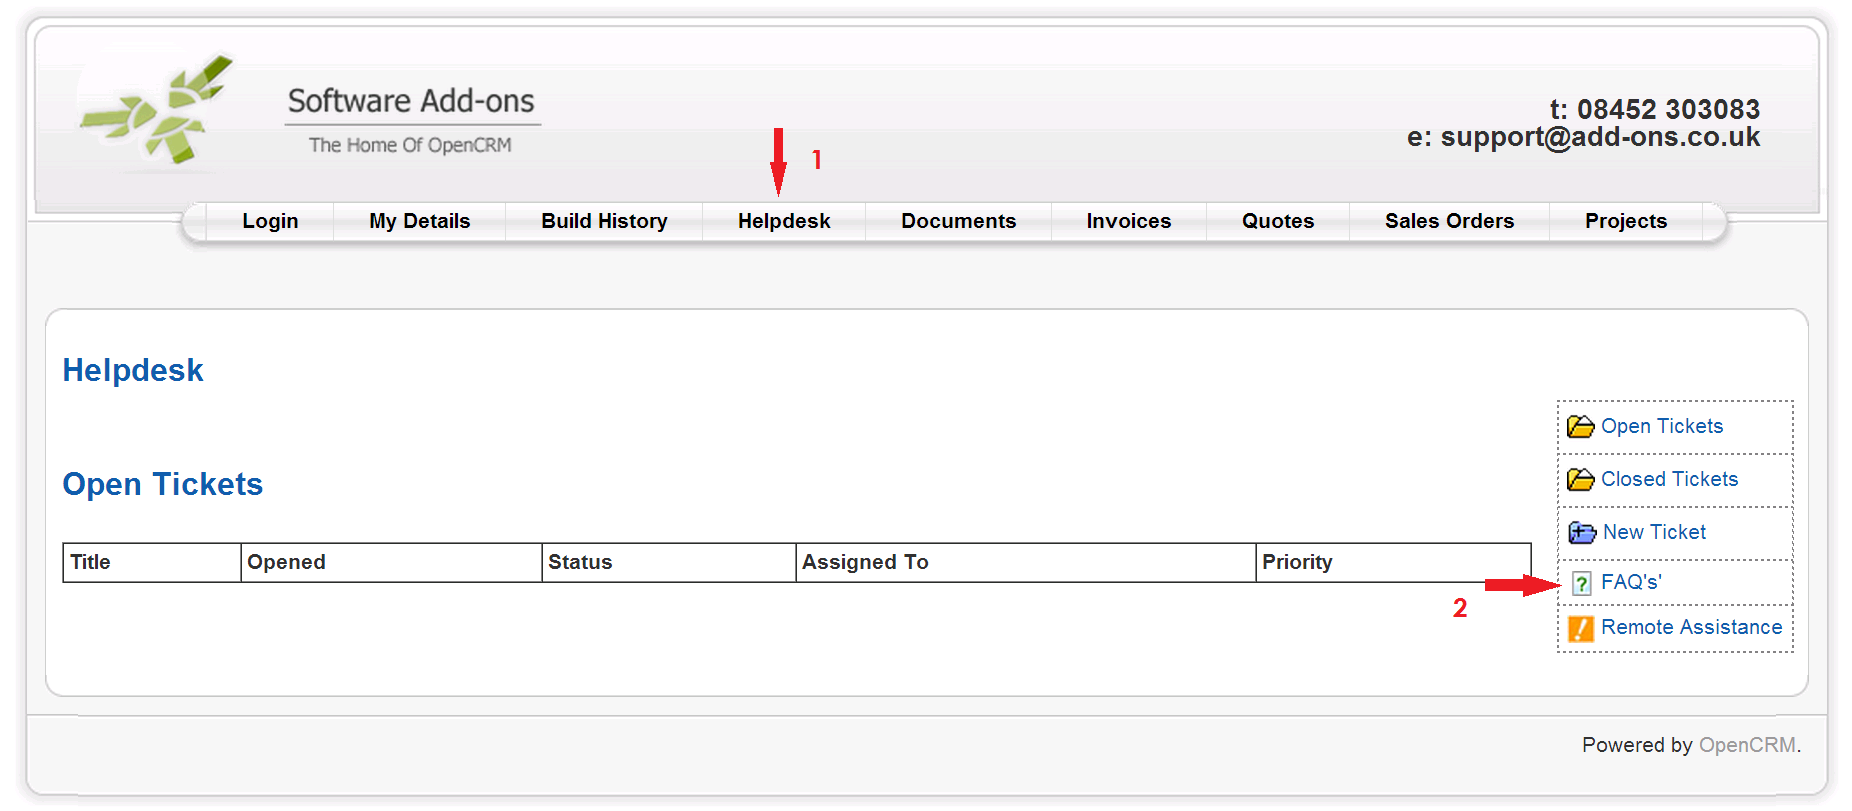
When they sign into your portal, all they have to do to view and search your FAQs is click the link to HelpDesk and select FAQs from the menu on the right.
It will appear like this:
Need More Help?
If you have any questions, just start a Live Chat, "Click" on the Chat Icon in the lower right corner to talk with our support team.


