Important : Please ReadThere are a number of elements that you need to configure, all of these come with some level of caution and you should not attempt these without your Accountant or a Company Director taking responsibility for any decisions you make. Software Add-ons Limited – The Home of OpenCRM are a certified App partner in the Xero marketplace and understand the development aspects of Xero Accounting Software but are not accounting specialists – you should seek independent advice from a Xero specialist when making any changes to your Xero Accounting installation and any integrations. Integration between Xero and OpenCRM shares sensitive financial information which should be treated appropriately. When you push a new Invoice to Xero it has the potential to create duplicates if the original Contact information does not match, you should plan how you will integrate the two data sets to avoid any duplication arising. If you have any concerns about your own ability to setup the systems to work together please speak with your OpenCRM Account Manager to schedule some time with our professional services team. |
Setting up a new integration
Before you can start sending your invoices from OpenCRM to Xero, you will need to:
- Authorise the two systems to speak to each other
- This may include connecting a single OpenCRM system to multiple Xero organisations
- Set up your Invoice statuses
- Check your Tax mapping
- Export your Xero Contacts and Companies into OpenCRM
- Setting up your Products
Before you get started, though, there are a few important things you should know about how this integration works:
- Line amounts are passed through as the full undiscounted amount. The discount rate is calculated to a percentage per line and passed through to Xero which then calculates the actual line total.
- Credit notes are transferred with list prices as the discounted amount because Xero does not support discount on credit notes.
- Update of balances on credit notes is not yet supported.
Step 1: Authorising the connection
You will need to be either a Finance or System Admin to carry out this configuration. Finance and System admins only are able to access the Xero settings page and send invoices to Xero or update balances from Xero.
To access the Xero Settings, go to the Invoice module, and click on the button to Connect to Xero.

Clicking this link will give you the below page. The Enable Integration box will already be ticked. If you untick this, it will remove your access to the Xero integration and you will need to contact OpenCRM to get this re-enabled. You will also need to have a minimum User level of "standard" in Xero. If you have access to "Invoice Only" within Xero, you will not be able to complete the integration.
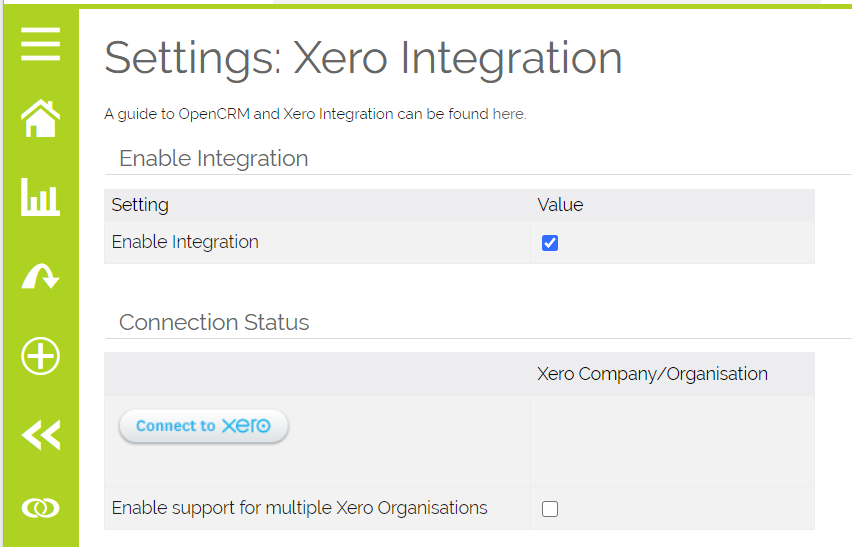
Clicking Connect to Xero will take you to a Xero login page where you can then authorise your OpenCRM system to connect to Xero.
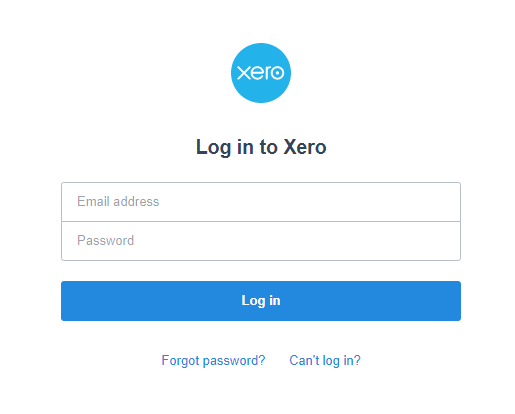
Once you authorise Xero to connect to OpenCRM, the two systems will stay synchronised. You will not need to regularly re-authorise the connection.
If you need to set up multiple organisations, proceed to Step 1a. Otherwise, just scroll on down (or click here) to move on to Step 2.
Step 1a: Connecting Multiple Xero Organisations
It is possible to connect multiple Xero organisations (from one single primary Xero account) to OpenCRM.
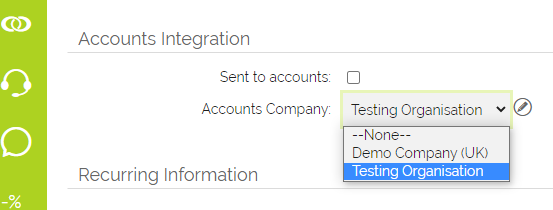
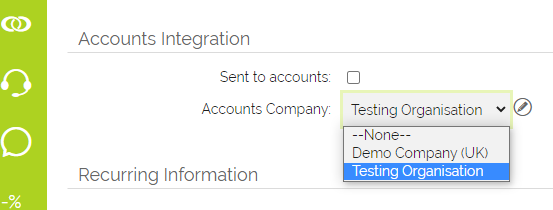
From an Invoice, you can select which Xero organisation to send the Invoice to. This uses the "Accounts Company" drop down which is activated when multiple organisations are set up and configured. You can also set a default Xero organisation at Company level. Any Invoices created for that Company will default to that Xero organisation.
To do this, simply tick the "Enable support for multiple organisations" check box. This will automatically enable the Xero Company drop-down fields on both Company and Invoice modules. The Xero Company drop down will be populated automatically with the names of the organisations you have connected to Xero, and if you connect more organisations (or remove any), the list is automatically updated.

Then repeat the process of connecting the first Organisation, selecting the additional organisation that you want to connect. You will then see both organisations listed in the table which shows you your connected organisations:

Step 1b: Setting the Accounts Company based on the User
There is a setting that allows you to set the Accounts Company field on Sales Orders, Purchase Orders, Invoices and Companies based on a value in a User record.
Going to Settings > Xero Integration, where you can add Users to a Xero organisation.

Clicking on the Select User button will allow you to select the Users on your system and assign them to that Xero Organisation. Users can be associated with one Company only. Clicking the Users button will list the Users assigned to that Company.
When creating Sales Orders, Purchase Orders and Invoices you can set the Accounts Company. You can use this Setting to configure this:
To set this at User level, go to the User record in question and Edit. Under Xero Integration Settings, you will find a Default Xero Organisation picklist - this will give you the option to assign that user to a Xero Company:

Please note:
- If you connect multiple organisations and do not tick the "Enable support for multiple organisations", the "Accounts Company" field will not be available and attempting to send any invoices to Xero will fail with an error - because OpenCRM will not know which organisation to send to
- If you connect multiple organisations and tick "Enable support for multiple organisations", the "Accounts Company" field will be available and the invoice must have an organisation selected in this list for it to be sent to Xero
- If you connect just a single organisation and tick "Enable support for multiple organisations", this will work but the correct organisation must still be selected in the "Accounts Company" drop down on the Invoice.
- If you connect a single organisation and do not tick "Enable support for multiple organisations", the "Accounts Company" field will not be available and all invoices will be sent to the single company setup
- If you later connect a second organisation and do not tick "Enable support for multiple organisation", the "Accounts Company" field will not be available and attempting to send any new invoices to Xero will fail with an error - because OpenCRM will not know which organisation to send to. Existing Invoices can still be sent/ updated
- If you later connect a second organisation and do tick the option to enable support for multiple organisations, the "Accounts Company" will be made available. Existing Invoices will already be set with the organisation that they were sent to when only one organisation was configured. You will need to select the correct organisation to send to on any new Invoices.
- If using a single Xero organisation and the Xero organisation connected to OpenCRM is changed - all Invoices pushed to the original Company will remain associated with that Company. You will not be able to push them to the new Xero Company without first amending the "Accounts Company" field on the Invoice to set it to match the name of the new Xero organisation.
Step 2: Setting Tax Rates
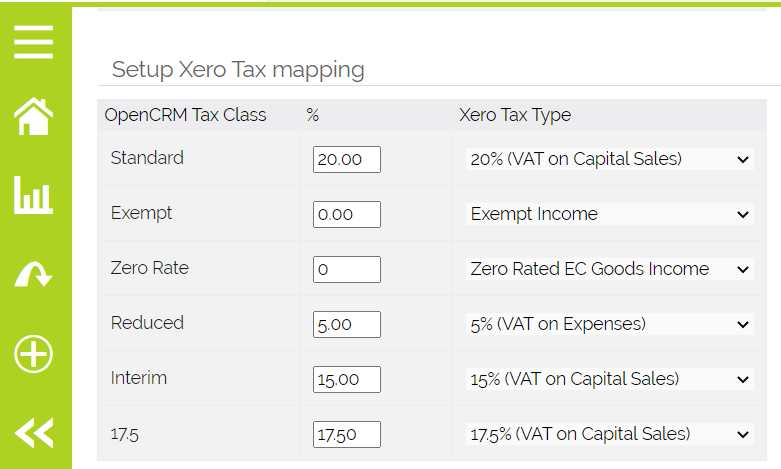
Tax table / rates can be associated with tax rates in Xero via the Settings page in OpenCRM, please see this FAQ for more information.
Step 3: Choosing Invoice status when pushing to Xero
You will now need to select what status invoices are posted into Xero from OpenCRM. Draft, Submitted and Authorised.

This controls which list in Xero they are added to - Draft, Awaiting Approval, and Awaiting Payment.

Please note that it is possible to post to the Draft status without, for example, accurate nominals. Posting to the other statuses requires all of this information to be final and correct and attempting to send invoices to Xero without this information correctly filled in will result in errors.
Step 4: Syncing your Contacts and Companies
If you have been using Xero prior to integrating with OpenCRM, you will need to run an import or an update import.
The Xero Reference field is the unique identifier that is used to match up records in OpenCRM with existing data in Xero. OpenCRM's integration with Xero allows you to create a new Client record, with a Primary Person linked (first name, last name, email address). If you sync a subsequent invoice for the same client, but with a different Person linked, it will not add a second Person, but will overwrite the first Person.
This reference is not available on a standard Xero export or report, so you will need to use the tool built into the Xero Settings page in OpenCRM, as per the screenshot below:

This will create a csv file that looks like this:

A note on multiple Xero organisations
If you are connecting multiple Xero organisations to OpenCRM, a separate export link is provided to export contacts for each organisation.
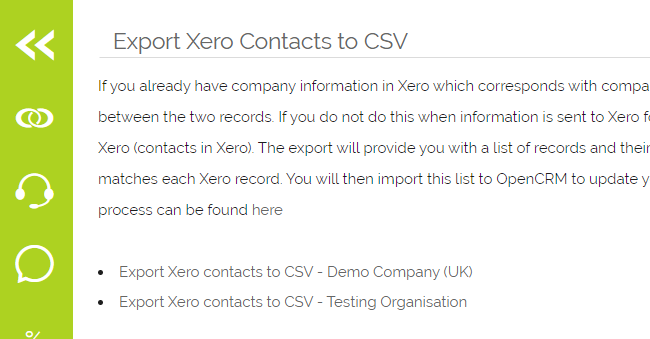
The Xero organisation is included as a column on the export to help OpenCRM make the link between Xero and OpenCRM when importing the company into OpenCRM.
It is important when importing Xero contacts to OpenCRM that the External ID is set as part of the import as this is what OpenCRM uses to match the company in OpenCRM to the company/contact in Xero.
Importing New Client Data into OpenCRM
If your client data is present in Xero, but not present in OpenCRM, then you can carry out an import to create new Company records in OpenCRM. Click on the link that says "Export Xero contacts to CSV" on the Xero Settings page in OpenCRM:

This will perform an export of your client data held in Xero. They key columns to note are ContactID (= Xero Reference) and Name (Company Name).
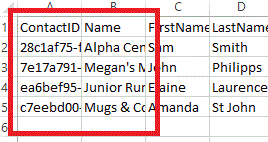
As well as this key information the export provides details such as a Contact person, email address, telephone and address details. The export also provides numerous columns of information exported from Xero that you are not likely to need in OpenCRM e.g. "AccountsReceiveableTaxType" or "BankAccountDetails".
1. You need to decide which columns you wish to import. You may need to create custom fields for non-standard information, in which case please refer to this guide on how to create custom fields in OpenCRM
2. Formatting the address columns in Xero to match the formatting in OpenCRM. Typically, you will want to import the address details into the fields Billing Address Street/ Billing Address City/ Billing Address State/ Billing Address Postcode/ Billing Address Country. So, you will need to concatenate AddressLine1 and AddressLine2 into one field, to populate the Billing Address Street field in OpenCRM. See this FAQ for details on how to concatenate two (or more) fields in Excel
3. Once you have formatted the data, you can proceed with the Import. You will need to import the Company details into the Companies module, and if you want to add the Contact details, you should import this to the Contacts module. Go to the relevant module and select the Import option

The key fields to map are the Xero Reference and Account Name. You can map the other fields as described above. once you have finished, select Import Now at the bottom of the import screen and that will launch the import and create the Companies in OpenCRM.
4. You can repeat the process to import into the Contacts module, and create Contacts that will be linked to the Company.
Updating Existing Client Data in OpenCRM with Xero information
The procedure for carrying out an update import is very similar to doing a new import - you pick the columns you wish to bring into OpenCRM. The difference is that at the bottom of the Import screen you select the option to Update Existing Records before hitting Import Now.
For OpenCRM to know which record to update, you need to add a column to the spreadsheet, containing the CRM ID from the matching record in OpenCRM. You can use the VLOOKUP function in Excel to match the Xero Reference to the correct company. You should be OK with using the Company Name as the identifier to match up records however if you have more than one Company with the same name you will need a more sophisticated solution (e.g. using the Company Name and Postcode as the unique identifier).

Once you have matched up the Company with the relevant CRM ID, map the fields you want to update in OpenCRM. The key fields to map are the CRM ID field, as this is the look-up field that will be used to update the relevant record, and the Xero Reference, or ContactID field, which is the identifier that will be used to look up the correct Company record in Xero.
Single Customer for Multiple Xero Organisations
If you do business across your multiple (Xero) organisations with a single customer (Company in OpenCRM language), this section relates to you.
There are two ways to handle this in OpenCRM:
- A single company in OpenCRM linked to the multiple companies in Xero
- A company in OpenCRM for each company/contact in each organisation Xero.
A few reasons this matters
- If they have a company in OpenCRM for each company/contact in each organisation in Xero, the workflow they are talking about for setting the invoice to go to the right company may not be relevant as they could just set the default at the company level and the user just selects the right company? (they'll need to select the right company anyway or the invoice won't go if the company name is the same in Xero for all three or will create another record in Xero for the essentially same company if the names differ)
- A company for each Xero company in each organisation will maintain invoice balances which reflect the balances for that company in the relevant Xero organisation
- A single company for all companies in all Xero organisations will maintain an overall invoice balance for all invoices in OpenCRM as opposed to the balances for each Xero organisation.
In OpenCRM, if you link invoices for different Xero organisations to the same company in OpenCRM, that single company in OpenCRM will be linked to companies in multiple Xero organisations. This means that balances on that company will reflect the total of all invoices for all Xero organisations. They will not match up with the balances shown in individual Xero organisations.
So if you want to maintain balances on the company which reflect the balances of the company/s in Xero, then you need to create a separate company in OpenCRM for each instance of the company in each Xero organisation.
Configuring Xero Integration to maintain the Contact / Product values in Xero
When OpenCRM pushes an invoice through to Xero, it also updates the contact linked to that invoice and any products linked to that invoice with the latest details from OpenCRM. In the case of contacts, that is the contacts address, name, email, phone etc. In the case of products, that is the product name, description, prices and nominals.
If you want to configure Xero integration, but you do not want the Xero Contact details or Product details to be updated from OpenCRM, there are some hidden settings which can be activated in order to achieve this. New contacts and products would still be added to Xero where they are missing, but no fields would be updated on existing items. You will need to contact OpenCRM support to configure these options as they are not yet available on the settings screen.
Step 5: Setting up Products
When you push Invoices from OpenCRM to Xero, it will create the invoice and either link to existing or create new Companies and Products.
Product (Inventory) Name in Xero is limited to a length of 50 characters. If your products are set up in OpenCRM with a longer name (in excess of 50 characters), you will need to modify the name to allow the integration to work.
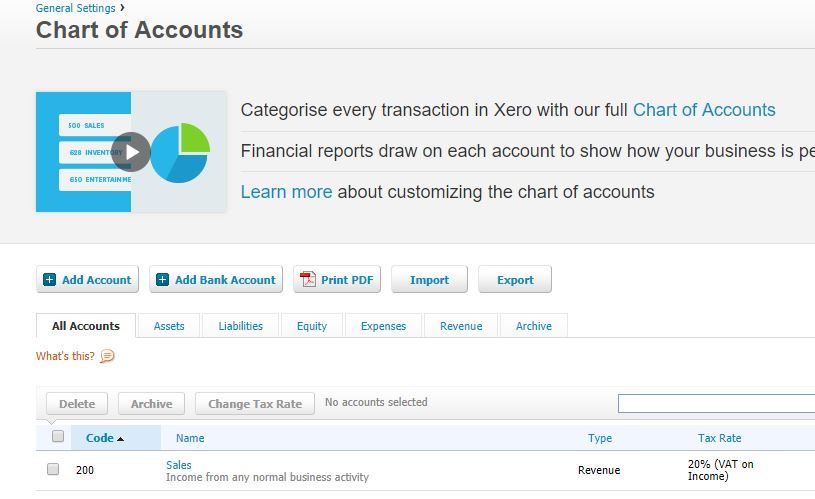
The Nominal Information on the Products is used to map the Invoice as a Sale, so you should ensure that the Nominal Codes in OpenCRM are set up to match the values in the Chart of Accounts in Xero. The default code in Xero is 200 for Sales.
Note that if you have migrated Product data from another accounts package into Xero, you will need to make sure that you have set the Chart of Accounts in Xero appropriately and that you have matched these with the Sales Nominal fields in OpenCRM.
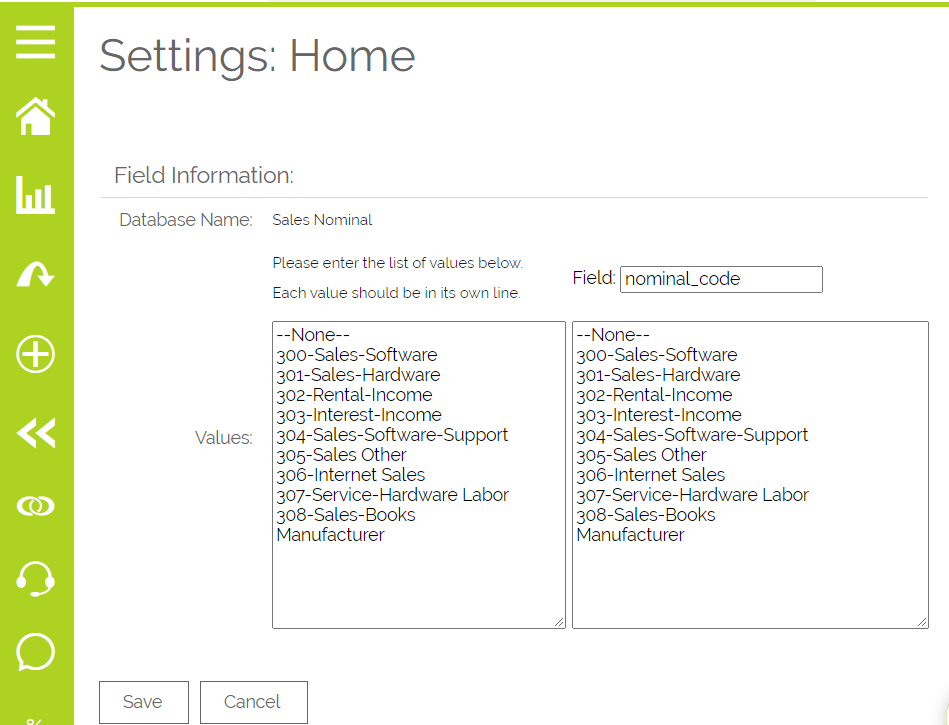
Within the OpenCRM Nominal Code settings, you need to match the values used in Xero, in this case, this means setting up a Nominal Code of 200. This can be done by going to Settings > Edit Picklist Settings > Edit Products Picklist > Edit Sales Nominal.
Once you have done this, you should do an update import or bulk update on your Products, to update the Nominal Code fields to contain the relevant information. If you are at all unsure about how to do this, please contact support or your account manager at OpenCRM.
If the values between the Sales Nominal list in OpenCRM and the Chart of Accounts in Xero do not match, you will get an error message when attempting to push Invoices from OpenCRM to Xero:

Nominals & Tax Setup for multiple Organisations
OpenCRM can only manage one set of product nominal and tax classes. As such, when configuring Xero integration with multiple organisations, all Xero organisations must share common Nominal codes and tax classes (and mapping).
In the instance where one of the organisations has a unique tax class or nominal, this can be added but this will need to be mapped in the Xero configuration and will be available in OpenCRM for invoices for any organisation. If an invoice is sent to an organisation which does not have this nominal or tax class setup, an error will occur.
Configuring Xero Integration when you've already been using Xero and OpenCRM
Existing Xero Contacts/OpenCRM Companies - Importing Companies/Xero Contacts into OpenCRM correctly to match them up
You can export your Xero Contacts from the integration page in order to import them into OpenCRM so that when you raise invoices against the companies in OpenCRM they are already linked up to the correct Xero companies.
If you do not do this and try to raise an invoice against a company of the same name as an existing company in Xero, OpenCRM will be unable to push the invoice to Xero. If you have a similar, but not identical company name for the same company in Xero, then a duplicate will be created when the invoice is pushed to OpenCRM
Important: When mapping the company data from Xero on the company import screen, you must ensure the following three fields are mapped to ensure the records are linked up correctly:
- Account Name : Name * Not needed if doing an update import
- Xero Reference: ID
- Accounts Company : XeroCompany
- CRMID or External ID if used : OpenCRM record ID *Only needed if doing an update import
If (some of) your companies already exist in OpenCRM, you can either import the Xero companies and then manually merge the duplicates (or contact support for setting up a more automated merge), or manipulate your data spreadsheet to insert the OpenCRM ID of the company and perform an update import to match the OpenCRM company to the Xero one.
Existing Invoices
If you have existing invoices in Xero and OpenCRM, and their Invoice numbers are the same, make sure the "Accounts Company" field on the invoice is populated with the name of the Xero Organisation that the OpenCRM invoice belongs to, then once you are setup, click "Update All Outstanding Invoices from Xero" link at the bottom of the invoice page - that will link up all the outstanding OpenCRM invoices with their matching Xero invoice and update the invoice in OpenCRM with the balances and paid status in Xero. Please note that this will NOT update any invoices that are marked as Paid in OpenCRM but it will collect updates from Xero for invoices that are marked as Paid in Xero, and update OpenCRM invoices accordingly.
Pushing Existing Paid Invoices from OpenCRM to Xero
Paid invoices do not get sent to Xero by default (either when selecting from a list or clicking "Send all outstanding" because any invoice which has a payment in Xero cannot be updated by OpenCRM. However, if setting up the integration for the first time and want to send existing paid invoices into Xero - this is possible. Please contact support to enable this.
Limiting Invoices Passed from OpenCRM to Xero
You may not wish to be able to send all of your prior invoices to Xero from OpenCRM. If you wish to configure the integration so only invoices after a certain date or invoiceid can be sent to Xero (preventing old records accidentally being pushed to Xero by your users), contact support who can configure this for you.
Existing Products/Xero Items
If you have existing products in OpenCRM and matching items in Xero, if you make sure the product codes on both Xero and OpenCRM are the same, OpenCRM will use the existing Xero items on invoices it creates in Xero. If they do not match, OpenCRM will create new items.
Disconnecting Xero Organisation/s
This can no longer be done from within OpenCRM. You can disconnect your organisation from OpenCRM at any time within Xero. Whilst you have the organisation to disconnect selected in Xero, go to Settings,
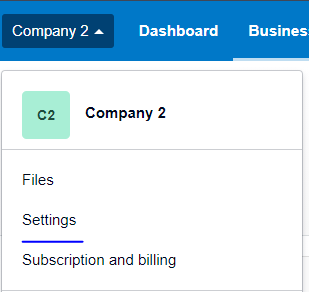
then Connected Apps
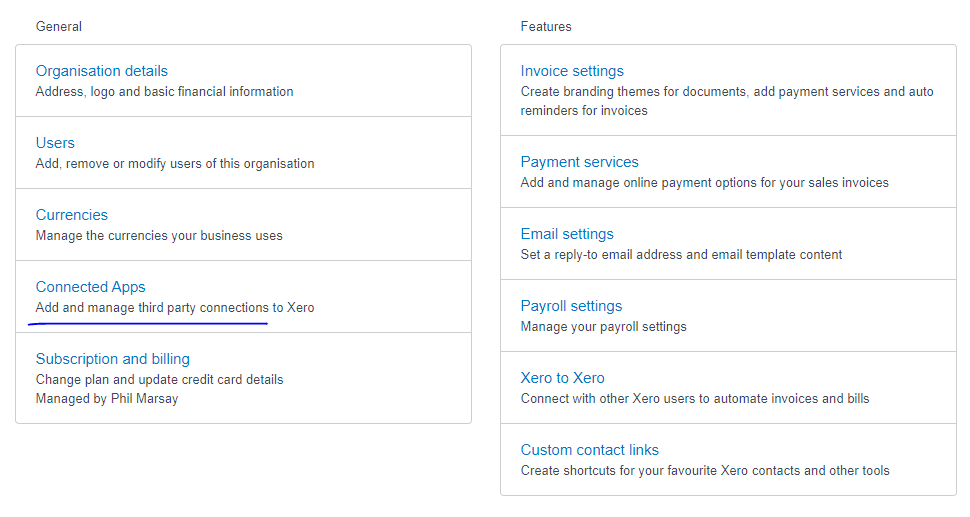
then click Disconnect

You will no longer be able to send invoices to that Organisation. It will automatically be removed from the list in the accounts company drop down.
Need More Help?
If you have any questions, just start a Live Chat, "Click" on the Chat Icon in the lower right corner to talk with our support team.


