Using an auto-email or auto-SMS rule, you can configure the system so that an email is automatically sent to a Contact and/ or User, when the specified criteria are met.
To set up or edit auto-email rules, go to Settings > Configuration > Auto-Email/SMS Checking Rules
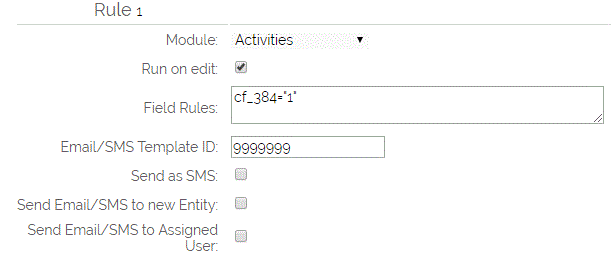
You will see a screen that looks like this:

Configuration
Module - use the drop-down menu to choose which module you want to run the rules on.
Run On Edit - If this is ticked, the rule will run on both brand new records, and when a record is edited and saved, otherwise it will only run on the first creation of the record. Note that if you set a rule using "Run on edit" , you need to use a "field has changed to" rule, not just a "field equals" rule (see notes below).
Field Rules - Use this section to set up the criteria required. An example would be that you want to send an email if a Quote reaches the Stage of "Reviewed". In this case, you would set the Field Rules to be quotestage="Reviewed". You can also use more than one rule, so for example when the Quote is Reviewed and is assigned to a particular User. Any additional rules needed to be added as separate lines into this box - see an example below. To find the Field Names, look for the suffix ie after the final _ therefore for the example above, where the FAQ lists $rel_quotes_quotestage you just need the final quotestage. If you get stuck here, please contact our Support team.
Email/ SMS Template ID - specify the ID of the email you want to send automatically. For details on how to find the ID, click here. Note that entering no template ID will result in a blank email being sent
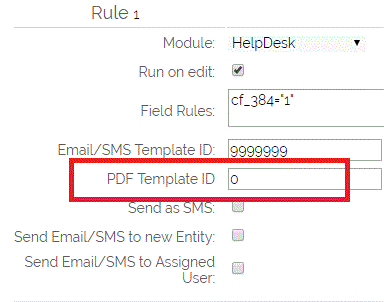
PDF Template ID* - When you have specified a module from which you can generate a PDF (Companies, Opportunities, Quotes, Sales Orders, Purchase Orders, Invoices, Helpdesk, Contracts, Projects), an additional line will appear allowing you to enter the ID of the PDF template to use. To find the ID of the PDF template, open up the template you wish to use and the ID can be found within the URL:
Send as SMS - Send the message as an SMS message instead of an email, if SMS sending is configured on your system
Send Email/ SMS to new Entity - If this option is ticked, then the email is sent to the record linked to the entity which triggered the rule
Send Email/ SMS to Assigned User - If this option is ticked, the email is sent to the assigned user on the record
Additional Helpdesk Options
On the Helpdesk module you can also control whether the email that is triggered is sent to the linked Contact and/ or the linked Company/ Contact in the 3rd Party field. A new field will appear if the "Send Email/ SMS to new Entity" field is ticked. The available options are as follows:
Primary Contact - This will send the email to the Primary Contact on the Helpdesk ticket.
3rd Party - This will send the email to the Company or Contact linked via the 3rd Party field on the Helpdesk ticket.
Primary Contact / CC 3rd Party - This will send the email to the Primary Contact, and CC the Company or Contact linked via the 3rd Party field on the Helpdesk ticket.
3rd Party / CC Primary Contact - This will send the email to the Company or Contact linked via the 3rd Party field, and CC the Primary Contact on the Helpdesk ticket.
Both - This will send two emails, one to the Primary Contact and one to the Company or Contact linked via the 3rd Party field on the Helpdesk ticket.

Setting up auto-email rules
You can set up rules to run when a new record is created, or when a record is edited and information in that record is changed to meet the criteria required. If you want to run the rules when a record has been changed, you will need to tick the Run On Edit option and you will need to use the operator explained below to use to track a change in a field.
For New Records
To trigger an email based on a new record that is saved you need to set up the rules along the following lines:
Creating a Rule running on Multiple Conditions
If you want to use multiple conditions (ie match rules A and B and C etc) then enter each rule on a new line. For example:
This will then only trigger the Email rule if the conditions for both Region and Contact Type are both met.
Triggering the same Rule using different Conditions
If you want to trigger a rule based on an OR rule (e.g. Contact Type should be either Customer or Prospect), put these values, comma-separated, on a single line:
When using Run on Edit
field = "oldvalue" >> "newvalue"
Replacing old value with "*" will tell the system to accept any change to the new value
Other operators are accepted, replace the = with another recognised comparison operator (e.g. not equal to !=, for numbers and dates >, >=, <, <=)
You may also use "today" for date fields to check against today's date.
Entering no value for the rules will assume all entries for the selected module.
Where is the email sent?
For each module, there may be different behaviour as to how the system determines who to send the automated email to. In most cases, it is the same as if you were to hit the "Email" button from the record within CRM. Where this differs, is listed below:
Activity: Sends to record linked in Contact field if there is one, failing that to record linked in Related to the field if there is one.
Sales Order/ Invoice/ Quote/ Opportunity: Sends to record linked in the Contact field
Helpdesk/ Project - Sends to the record linked in the Contact field
An important note for rules triggered by an external source such as the Portal or a Jotform submission
As these emails will not be triggered by a User updating data on the system, the emails you send via the rules need to have a Sender email address populated:
Need More Help?
If you have any questions, just start a Live Chat, "Click" on the Chat Icon in the lower right corner to talk with our support team.


