Built into OpenCRM is integration with Jotform : sign up here.
- Setting up the integration between Jotform and OpenCRM
- Creating the Form in Jotform
- Mapping your form fields to OpenCRM fields
- Updating existing OpenCRM records via Jotform
- Force case formatting
- Duplicate checking
- Form throttling and Spam protection
- Set up notifications
- Using Jotform offline
- Ensuring Documents uploaded via a Jotform can be retrieved in OpenCRM
And then we move on to some other fantastic things you can do with the OpenCRM-Jotform integration:
- How to create and use a Hidden Field in a Jotform (for example to capture the Lead Source of a form submission)
- Linking to existing OpenCRM using Jotform
- Mapping fields to multiple modules
- Upload files to OpenCRM from Jotform
- Use a Jotform to add Contacts to an Event - please see this FAQ for further details
If anything doesn't look right, check out the Troubleshooting section or give our support team a shout.
Note : Many of the complications with this type of integration have been automated making the process of creating forms and capturing the submitted data into OpenCRM very easy to manage.
Important: You need to contact our OpenCRM support team (support@opencrm.co.uk) and let us know if you are going to be using Jotform's USA or EU database. We will need to direct your system to the correct one.
Important: Jotform Teams. This ability was added in late 2023 and it was decided not to support this feature in the OpenCRM integration. If you wish to categorise the forms you hold in your account you can easily achieve this by using Jotform folders. The OpenCRM integration supports the use of Jotform folders.
1. Setting up the integration between Jotform and OpenCRM
This requires you to already have a Jotform account : (use this link to sign up > top right select the Sign Up button and create an account).
Once you are logged into your account, hover over the 'Cat' icon in the top right corner and click on Settings
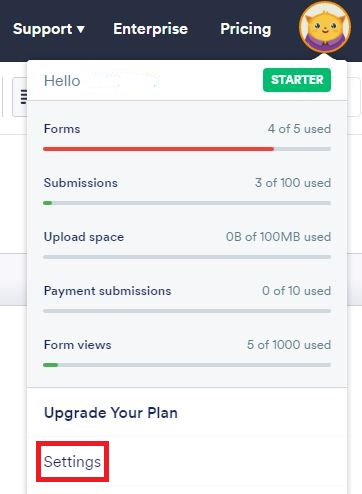
Then click the API link on the left hand side:
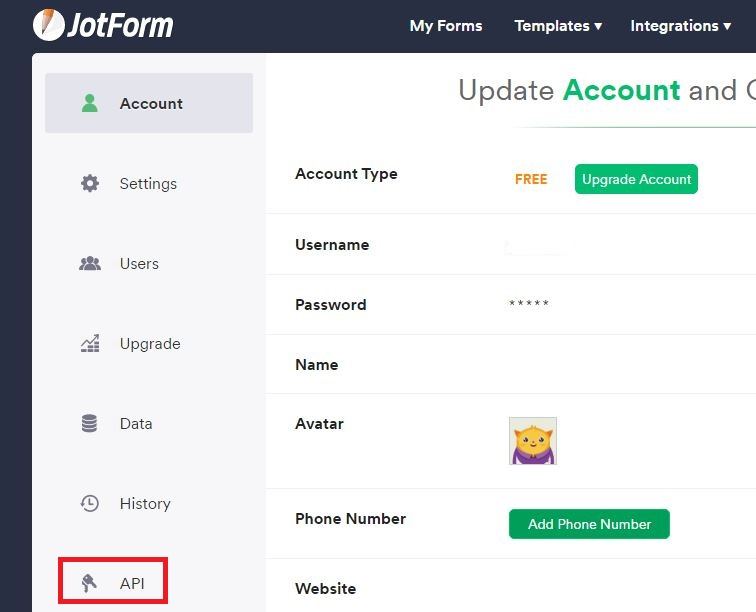
If this is your first time creating an API key you should click the Create New Key button. This will create a unique API Key. You should then select the Permissions drop down and change this to Full Access:

You may wish to change the name for your API key to reflect where it is being used, 'OpenCRM' as an example. You can do this by clicking the API name and editing:

Note : Setting the API key permission allowing Full Access is required for OpenCRM to function correctly with your Jotform account. If you change this key for any reason in the future your forms will stop working until you update OpenCRM. You should keep your API Key safe and secret.
Now that your API key is configured in Jotform, you need to add this into OpenCRM.
Copy the API key from the Jotform API account screen (Ctrl + C or highlight and right click).
Login to OpenCRM as an administrator.
Go to Settings > Integration > Jotforms Initial Configuration:

This will take you to the following screen:
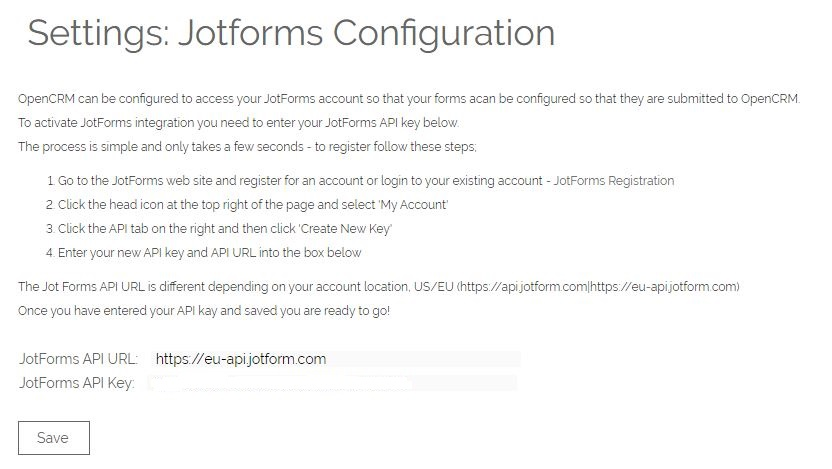
You should paste the API Key here and then Save.
This links the API key that you created in Jotform to your OpenCRM system and acts as a unique identifier allowing submissions from your Jotforms.
2. Create your first Jotform
This is where you can now go and enjoy the ease of use of Jotform and create your first form - have fun!
Use the tools in Jotform to create the form you require and just save it as normal, there is nothing else to do in JotForm.
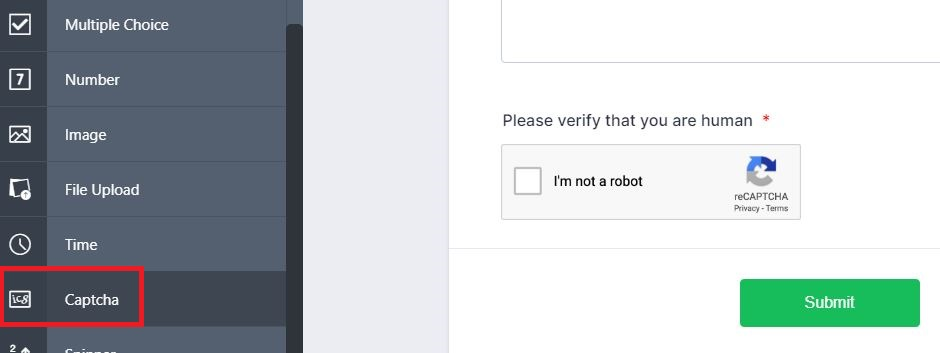
Recommended: When bringing data into OpenCRM from Jotform, you should always use a Captcha (or Capture) to help secure it from bot submissions:
Note : There are some 'special fields' in Jotform to make collecting commonly used data easier to set up, these include Full Name, Address, Telephone number etc... use these to make your life easier when creating new forms.
3. Mapping your form fields to OpenCRM fields
The last step is to set where the submitted data will be saved in OpenCRM. To do this:
Login to OpenCRM as an administrator.
Go to Settings > Integration > Jotforms Settings
You will be taken to a new page that dynamically shows the forms that have been created in your Jotform account
Note : This list is intelligent and filters out any forms that you have deleted but not yet trashed, it only shows active forms.
There are two hyperlinks on each form row - the main hyperlink (form name) opens a separate window with an example of the form - this makes identifying and testing easy. The second link is on the text to the right of the form, this will either display Create Mapping (when no mapping exists for the form) or Edit Mapping (if the form already has fields mapped and saved).
Note : The drop down at the top allows you to filter the forms based on the modules that have been mapped, this makes finding forms of a particular type much easier.
When you get to the Jotforms settings page, you will see a list of your forms with information about when they were created, edited, and some other details including which module they create records for.
We'll go into the other actions on the right in a bit, but for now, just click the "Edit" option on the far right.

This will take to you the Mapping screen.

The Module field at the top of the screen allows you to set which Module you wish the data to be saved into. The Module selection sets the fields available to be mapped.
The modules you can import to are:
Leads, Companies, Contacts, Opportunities, Helpdesk, Projects, Activities, Documents, Sales Orders, Assets and Contracts

You should select the field that you wish the data to be saved in, from the drop down list.
Note : JotForm special fields such as Fullname and Address will appear as separate fields for the relevant elements. The Address fields for Line 1 & Line 2 are concatenated into a single value to be mapped into the Street field, similarly the Phone field in Jotform (which is split into 2 elements) is concatenated into a single value to be mapped to OpenCRM Phone fields.
Once you have selected the field mapping you should click Save.
Note : there are a number of things that happen when you click Save - the configuration is written in OpenCRM to enable the correct saving of data. The associated JotForm is updated with a Webhook (this is done automatically) so that any submissions to this form will be pushed to your OpenCRM system.
If you now test the form, entering some data (remember you can get easy access to the form by clicking the form name which is linked), you will see records created in the relevant modules.
Special Fields
There are a few special fields when mapping Jotform fields to OpenCRM, the most important ones are;
Assigned To - You can set the values of any Drop Down in JotForm to be the ID Number (10) of the user, the Username name (grahama) or the real name (Graham Anderson) - the system will check for a match on the Assigned To field in this order.
Phone Number - The phone field in Jotform has two parts, the area code and the number, these are concatenated into a single value to allow easy population of the OpenCRM phone fields.
Address - The address field in Jotform shows up as separate elements within the mapping screen in OpenCRM, this allows you to map the various elements as you require.
Address - The address field in Jotform has Line 1 & Line 2 elements, these are concatenated in to a single value to make mapping to the OpenCRM Street field easier.
Fullname - The fullname field in Jotform is a single field with two elements, in OpenCRM we break this into the two elements to allow easy population of the two fields in OpenCRM (Firstname & Lastname).
Note: Duplicate checking will not work on the Full name field. If you want to duplicate check on any part of the name, we recommend using two text boxes.
Tick Box - If you want to populate a tick or check box field in OpenCRM with data captured in a Jotform, you need to use the form tool of Radio Button, rather than Check Box.
Signature Fields - Jotform offers both Signature and Image Upload fields. You can map either of these field types to a custom Image field in OpenCRM. The image or signature will display on the record(s) created in OpenCRM, and can be merged to PDF or mail merge documents.
4. Updating existing OpenCRM records via Jotform
If you want to give your prospects and customers the ability to update their records in OpenCRM without using the Customer Portal, this is possible using JotForm. You may want to read through this FAQ on how to populate a Jotform with information from OpenCRM.
There are two steps to this process:
- Mark which field you are using to match the Jotform submission with a record in OpenCRM
- Decide how various fields on the existing record should be treated.
Step 1: Match your submission with a record in OpenCRM
Once you have decided on which field to use (CRMID is best, but if you have other unique identifiers--like email address--these will work too), you need to tell OpenCRM to use that field to find the existing records.
Then you will:
- Tick the Update Records tickbox (purple arrow)
- Map the field as normal (red box)
- Tick "Match Field" in the far right column (red arrow)

This tells OpenCRM to do two things: a) look for existing records and b) which field to use to match your Jotform submission with a record in OpenCRM.
Step 2: Existing Records' data
Now you need to decide what to do with the other fields on that Existing Record. In the column titled "Existing Records", you will need to select how OpenCRM will bring the data in from Jotform and apply it to your existing record.
|
Update if not blank: This overwrites any data you previously had in that particular field...UNLESS the the new data is blank.
|
|
|
Update field: This overwrites any data you previously had in that particular field...
|
|
|
Do not update field: This ignores any new data from the Jotform, it keeps the original field content. |
|
|
Append to existing field: The new information from Jotform will be added onto the end of the data in OpenCRM. |
5. Force case formatting
Using the Jotform integration you can force the type of case formatting that you require.
There are two ways to accomplish this: the first is how OpenCRM treats any data that is submitted when the record is created and the second is what you do with the JotForm to control what your web browser sees when they enter data.
The OpenCRM Way
In OpenCRM, when you set up the mapping on a form, you can set up how you want the text to be formatted when the records are created.
|
No Change : Leave the data in the same format as it was submitted |
|
|
Upper Case : Set ALL of the characters to be Upper Case |
|
|
Lower Case : Set all of the characters to be Lower Case |
|
|
Upper Case Words : Set each word to start with an Upper Case character |
|
|
Upper Case Sentences : Set each first word of a sentence to be Upper Case |
The Jotform Way
For a more detailed use of JotForm and the most up to date instruction you should always go to Jotform support - from within your Jotform account you should select the SUPPORT option on the main navigation.
The way that you manage what the person filling in the form sees whilst they are entering data into the field is to add some CSS code to the form, which will force the capitalisation of entries.
To insert the CSS you should follow this article : How to Inject custom CSS on a form
Following these instructions you should insert the following code;
6. Duplicate checking
If you want to make sure that you aren't creating duplicate records with new Jotform submissions, there are two settings you need to pay attention to on the mapping screen in OpenCRM.
Allow Duplicate Checking (blue in below screenshot) - If you want your Jotform submissions to be checked against existing records in OpenCRM (duplicate checking), this must be ticked.
Dupe Check Field (red) - This is where you select which fields are used to carry out the duplicate checking. It is an exact match, not partial. If you select multiple fields, OpenCRM will check for an exact match on BOTH fields.
If you want to make sure that you aren't creating duplicate records with new Jotform submissions, there are two settings you need to pay attention to on the mapping screen in OpenCRM.
- Update Records (blue in screenshot below) - If you want your Jotform submissions to be checked against existing records in OpenCRM (duplicate checking), this must be ticked.
- If this is disabled when a duplicate is found the form is not processed any further in OpenCRM. No new record will be created and the existing record will not be updated.
- Match Field (red in screenshot below) - This is where you select which fields are used to carry out the duplicate checking. It is an exact match, not partial. If you select multiple fields, OpenCRM will check for an exact match on BOTH fields.

7. Form Throttling and Spam Protection
Now that you have your form all set up and ready to go, it's time to think about the security of submissions coming from JotForm into OpenCRM.
At the bottom of the mapping page for each form is our bot/spam protection settings. These exist to help to protect your OpenCRM system from spam/bot submissions to your JotForm by limiting the number of submissions OpenCRM will process in a given time period. This means that if a bot starts submitting hundreds of submissions every minute, OpenCRM will not be flooded with this bad data.
The settings look like this:
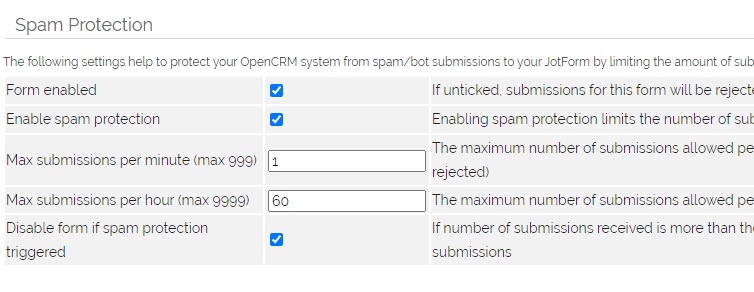
- Form enabled: Disable the form completely by unticking this box - do not accept any submissions from this form. This can also be automatically unticked if/when a form hits the throttling/bot protection thresholds.
- Enable spam protection: Whether the bot protection/throttling is enabled or not. If this is not ticked, none of the settings below it will apply.
- Max submissions per minute: Within a rolling 1 minute period - the maximum number of submissions OpenCRM will accept from Jotform.
- When a submission is received, the system checks how many others have been received for that form in the past minute and if it is more than the allowed number, the submission is rejected. *
- Max submissions per hour: Within a rolling 1 hour period - the maximum number of submissions OpenCRM will accept from Jotform.
- When a submission is received, the system checks how many others have been received for that form in the past hour and if it is more than the allowed number, the submission is rejected. *
- Disable form if spam protection triggered: If either of the minute or hour maximum submissions are exceeded, disable the form from receiving any further submissions - it will need manually re-enabling. System administrators will be notified that the form has been disabled.
* the next time a submission is received, if the count for successful submissions in the past period is under the threshold, the submission will be accepted unless the form has been disabled due to the "Disable form if bot protection triggered" setting being enabled.
7b. Reprocessing rejected/missing submissions
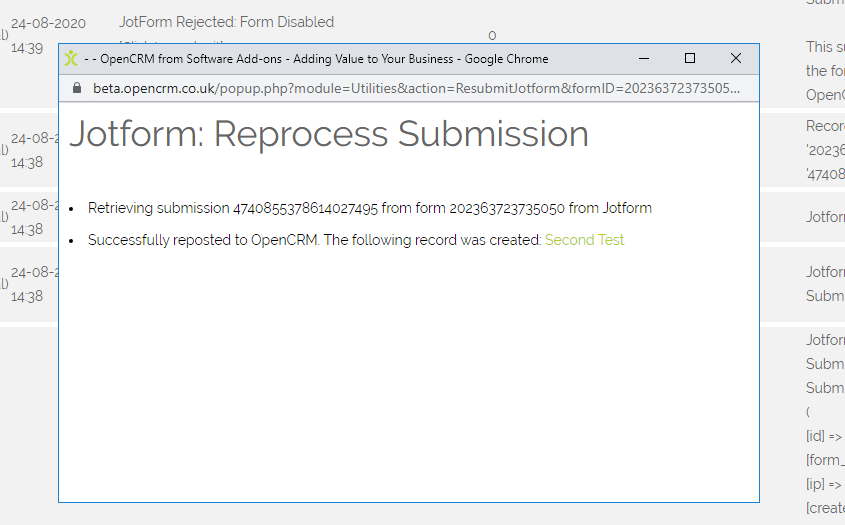
Any submissions that are rejected by OpenCRM can be "re-played" or resubmitted from Jotform by going to the audit log for the form and clicking "Resubmit". This is possible for any scenario where the submission was blocked by spam protection or if for any other reason, the submission was not received by OpenCRM.
You can resubmit or replay a submission from Jotform either via the audit log or from the bottom of the mapping screen for that form in OpenCRM. Clicking either will take you to the same screen.
- From the bottom of the mapping screen, click on the "Logging/View Submissions" section.

- From the main list view of your Jotform settings in OpenCRM, click the "Audit" link next to a particular form
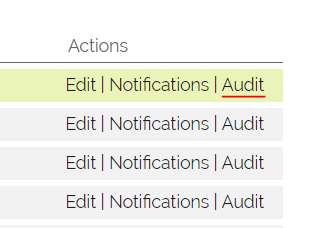
- The following screen will show a list of submissions received and rejected.
- Rejected submission will look like this:

- Clicking the "click to resubmit" option below the reason for rejection will pop open a screen that looks like this. It may take time for the second line to load, please do not close the window until it has.
8. Set up Jotform notifications
You are able to specify which users and teams should receive notifications when a Jotform is submitted.
There is also an option to send notifications to the record owner (Future release).
- To access this setting you need to go to the Settings area of the system.
- Scroll down to the Web Form section and select Jotform Settings.

- On the next page, you will see a list of Jotforms that you have set up.
- Access to the Notification/Emails setting is in the last column, you will need to find the Jotform that you would like to apply these settings to first from the list and click on the Edit that is in the last column labelled "Notifications/Emails"

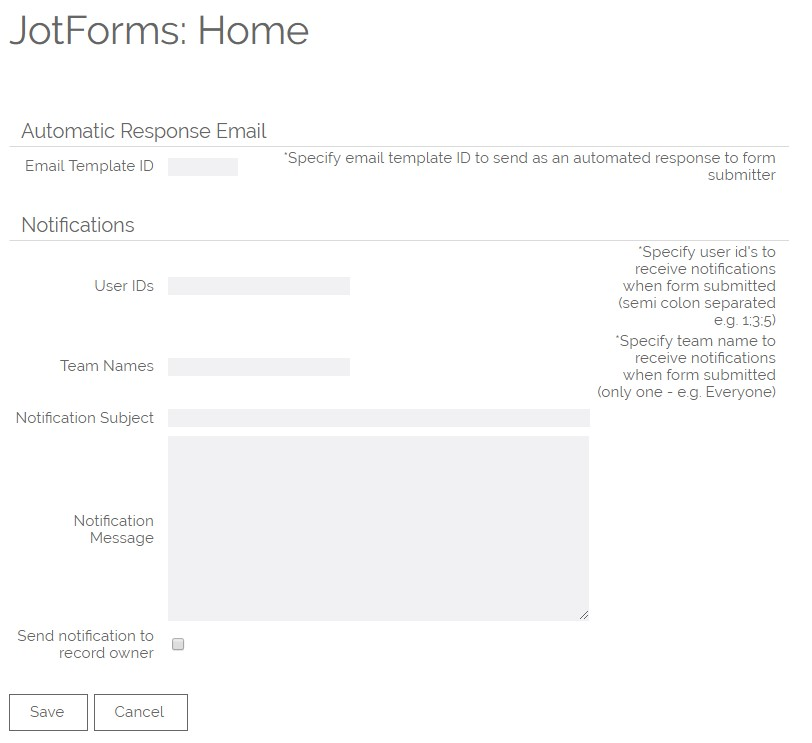
- On the next screen you have the following options:
- To specify the users to receive notifications - type user ids in the User IDs field separated by semi colon.
- To specify teams to receive notifications - type the team name to receive the notification (Note you are able to add only one team here).
- To send notifications to the record owner tick the box next to "Send notification to record owner"
- You are also able to add Subject and Message for the notification, just type it in the relevant fields (Notification Subject / Notification Message)
And of course, don't forget to Save once you are done.
9. Using Jotforms offline and bringing the data into OpenCRM
This is all answered in a couple of our TuesdayTip videos:
10. Ensuring Documents uploaded via a Jotform can be retrieved in OpenCRM
The default setting for viewing documents uploaded via Jotform within Jotform itself is to require the User to be logged in to be able to view the uploads. The result is that blank documents are sent across to OpenCRM. To prevent this you need to do the following in your Jotform account:
Click on your avatar in the top right corner and select Settings

Within Settings under the Security header, you will find the following "Require log-in to view uploaded files".
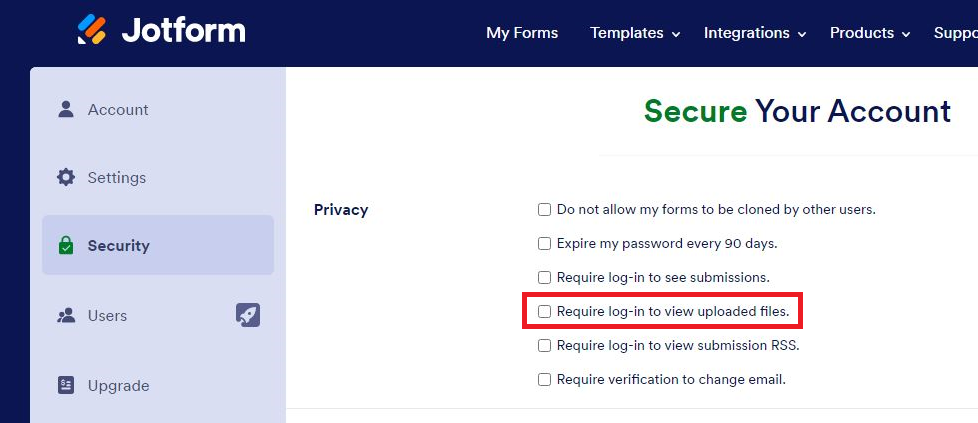
- Ticked – This means that when a submission comes in that includes a file upload. This will fail to be downloaded by OpenCRM due to a quirk in Jotform that requires a browser login.
- Unticked – This means that any submissions with a file upload will be uploaded to OpenCRM without any issues.
How to create and use a Hidden Field in a Jotform
A hidden field is a great way to pass information such as Lead Source from a Jotform submission into OpenCRM, without the form submitter needing to see or fill this information in.
To make a hidden field, you need to create a Text field, and use the Default Value option to fill in the information which should be passed across to OpenCRM.
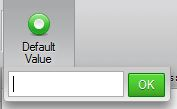
Use the cog icon to reveal the Field Properties, where you can select to Hide (or Show) a field
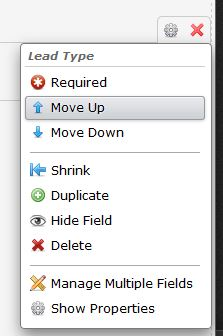
Your field will now look like this on the Jotform editor screen:

You can then map the hidden field to your chosen field in OpenCRM, and this value will always appear whenever a form is submitted online.
Top Tip: Using "0" in an Assigned to field will let you trigger the Round Robin rules you've already got set up in OpenCRM.
Linking to Existing Records using Jotform
You can use Jotform submissions to create multiple records in OpenCRM and link them together. Alternatively, you can have a Jotform submission create a new record, for example, an Activity, and link it to an existing record in OpenCRM.
How to link using the CRM ID?
In Jotform you need to create a field for the existing OpenCRM Record ID (CRM ID).
(Field type: Text Box, you should hide the field so that the form submitter does not see it)
To add a Default value: click on the Properties icon (Grey Cog) that appears next to the field, then Edit Properties and on the Properties screen enter the OpenCRM record ID into the Default Value field.
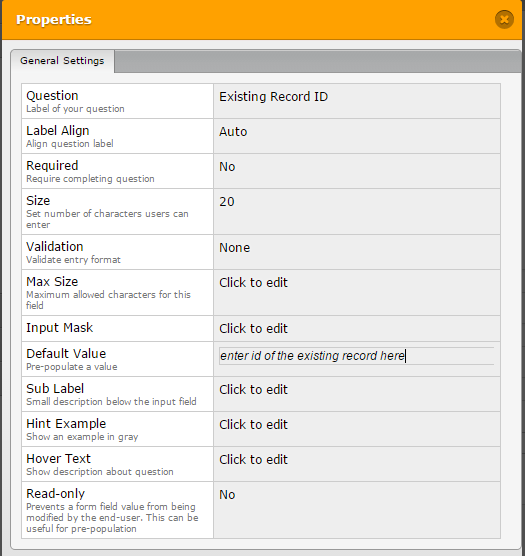
Alternatively, you can also pass this information across using the URL link to your Jotform. (See the instructions for doing this on this JotForm FAQ.)
In OpenCRM you need to tick the box in the Link Records column next to the ID field or map it directly to the "Related to" field.
In the following example, the "Ticket ID" field in Jotform is used to specify an ID of an existing Ticket in OpenCRM. So in order to link the entities created by the form to the relevant OpenCRM ticket, you need to tick the check box in the Link Records column next to the field.

Link Records - if the field in Jotform is used to collect an ID of an existing record, tick this column. OpenCRM will make a link between the entity created.
Mapping fields to multiple modules
You can create multiple entities with one Jotform submission, for example create a new Contact, Company and Opportunity record. This is fairly straightforward - Create the fields on the Jotform (e.g. Contact First & Last Name, Company Name, Opportunity Name).
By setting the Primary module - that ensures that this record is created first. It means that subsequent records created via the same Jotform (e.g. a Contact and a Project) will be inherently linked, and any subsequent Workflow will use up-to-date information from both (or all) records created from the Jotform submission.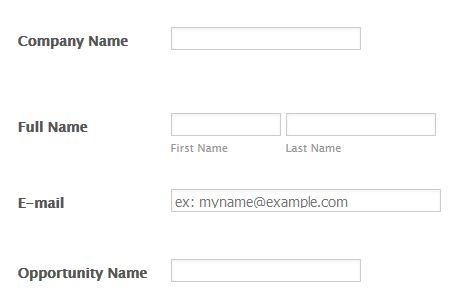
Add hidden fields to the Jotform. You will use these hidden fields to auto-populate when other fields are submitted e.g. when the "Company Name" field is filled in, this should fill in the (hidden) "Opportunity Company" field
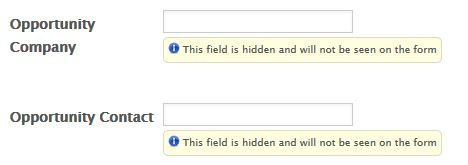
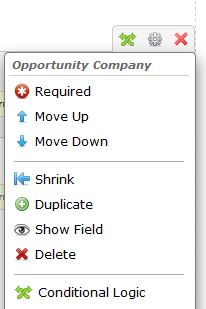
This auto-population is done by going into the Config settings within that Jotform field by clicking on the cog tool and selecting the Conditional Logic option:
Set up the conditions as required; in the example we want to copy the value from the Company Name field into the hidden Opportunity Company field
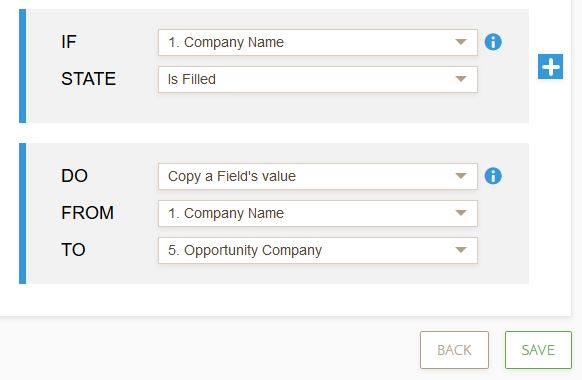
You can then review the condition(s) set up for the field selected.

When configuring the field mapping in OpenCRM, map the hidden fields in the same way that you map the visible fields.
That's it! Any forms submitted will populate the required fields in the modules that you have selected.
Upload files to OpenCRM from Jotform
When you add an "Upload" field type in your Jotfom, you can have this file appear in OpenCRM.
It will be created as a Document, which you can have auto-link to whichever module you are using to hold the Jotform information, i.e. Leads, Contacts, Companies, etc. Alternatively, you could just have the uploaded file create a Document on its own, without linking to another record.
To use this feature, you will need to:
1. Create a Jotform with an Upload field type and a field that can hold the Document subject (you might want to have this be a hidden field).
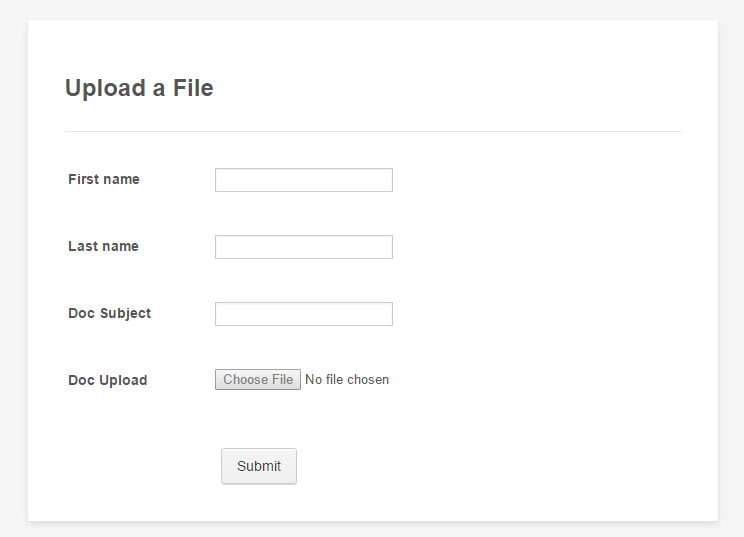
2. Go back to OpenCRM and set up your mapping as normal, you will see that the file upload field appears with the option to tick a box to allow the file to be uploaded into OpenCRM.Tick this box.
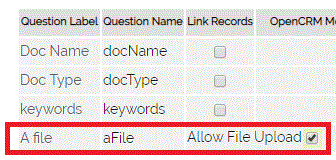
Important: Make sure you map the Document Subject field, otherwise your file will not be saved in OpenCRM.
Troubleshooting: My Jotform isn't creating records in OpenCRM. What should I do?
Check that your Jotform account is correctly connected to your OpenCRM system
From any form go to "Settings"
Select "Integrations"
Search for "Webhooks"
This should produce one matching option "Webhooks - Send submissions to your endpoint" select this
If all is well you should see the message "Integration Up & Running!" please contact our support team for further assistance
If you do not see this message you will need to add the missing Webhook,
in the "Add WebHook" box enter "https://yoursystemname.opencrm.co.uk/webforms/jotforms%20API/processJotform.php" replacing "yoursystemname" as appropriate.
Click "Complete Integration" and you should then see the "Integration Up & Running!" message.
Try your submission again
You will need to do this for each of your Jotforms
Check that your field types in OpenCRM match the field types on your form and the values you are submitting.e.g:
Do not try to submit text values to number fields
Do not try to submit currency prefixes to number fields.
You can also check the Activity Log (Settings -> all the way to the bottom of the screen)
Click into the search field and select "Integrations" (red in the below screenshot)
Click Search
You should see any Jotform submissions listed
If any haven't created records and you think you've fixed the issues above
You can now click "re-submit" to try them again (blue in the below screenshot)

Need More Help?
If you have any questions, just start a Live Chat, "Click" on the Chat Icon in the lower right corner to talk with our support team.


