This FAQ explores the various options for creating and sending emails or SMS messages on a pre-defined schedule. Known as Email Plans in OpenCRM-speak. This FAQ will cover:
- Email Plans - an Overview
- Adding a PDF to your Email Plan
- Using Email Plans for Events and Campaigns
- Email Plan in Action - what happens when an email plan is triggered
- Conditional Email Plans - how to trigger your email plans
- Polled Email Plans - triggering your email plans automatically
- Cancelling an Email Plan
Email Plans - an Overview
Email Plans are a way to schedule an email or a sequence of emails to be sent over a period of time to Leads, Contacts, and Companies plus a number of other modules, and at set intervals.
The SMS option is available on Leads, Contacts, Activities, Contracts, Documents, Helpdesk, Opportunities and Projects. For Leads and Contacts, the SMS messages will use the mobile phone number on the relevant record. For all other modules, they will use the mobile number of the Contact that is linked to the entity.
You can create an Email Plan consisting of any number of email templates and tell OpenCRM how long to wait before sending each email after you have subscribed a person or company to an email plan for their respective module.
Email Plans are built in very much the same way as Action Plans are created. For more information about Action Plans please see this FAQ.
Email Plans Settings
To configure an Email Plan you will need administrator access to your OpenCRM system. Go to Settings > Workflow & Automation > Email Plan Settings and you will see the list of modules you use Email Plans with.
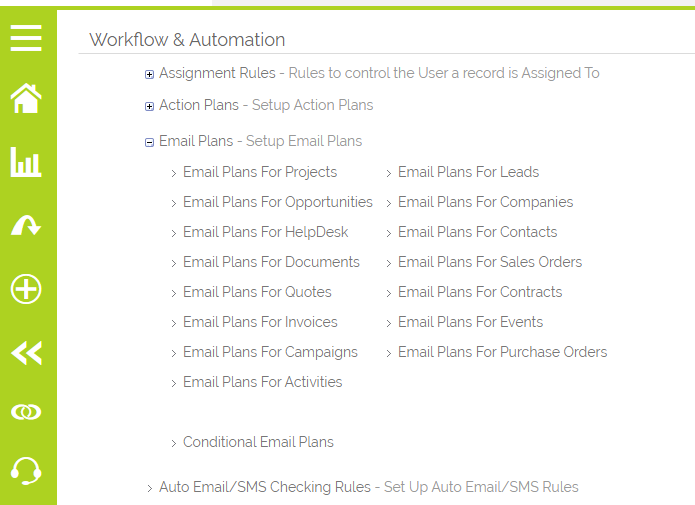
Select a module to create an Email Plan. On this screen you can either create a new Email Plan, or view and edit your existing Email Plans for the module selected.
Creating a new Email Plan
Select the module you would like to set the Email plan for. Click the New Email Plan button - this will create a new block where you can start to build your Email Plan.

- Give your Email Plan a name - you will later use this to select the Email Plan when adding to a record or setting up a Conditional Email Plan.
- Select which "Date Field To Use":
- This controls the date value used as the base from which to generate the email plan. E.g. if set to "Created Date", actions would be generated the configured number of days, months, and years from the created date.
- All the modules available date fields are available in this drop down, custom date fields as well
- The default "Run Date" option uses the base date of the current date and time.
- In the Email Template column use the picklist to choose your first email template.
- Start in: Set how many Days, Months, Years the system should wait before sending the email after a Lead, Contact or Company has been assigned to an Email Plan.
- Specify the time of the day you want the email to be sent. You have two options:
- From this time - the number of hours from when the date field is set to run. You can use this to set an email to be sent out 1 hour after someone has signed up to your service, for example.
- On this time - specify a set time you want the email to send. So if you always want webinar invite emails to go out at 10:30am, for example.
- Set Nearest Working Day if you only want emails to be sent during your working week as configured under Setttings > Company Information. See this FAQ for more information.
- You can set Office Hours if you only want your opening hours / days to be counted when determining the time and date to send your email. For example your email is set to send in 1 day and 12 hours, the day will be deducted based on your Company Information only at the next working day, the hours will then be deducted from the wait based on the open hours of the subsequent days.
- Set the Users column to control who the email should appear to be sent from and who it should be assigned to. Note: if your template has a From Name and From Address set these will be used over the user details specified here.
- Click Add Email to add additional templates to the Email Plan
- Click the "X" to remove an email
- Click Delete Email Plan to delete the entire Email Plan.
- Click Save to confirm your changes.
The Users column shows a full list of your active users. In addition to these, you can select Creator - this will assign the scheduled emails to the User who activates the Email Plan on a record. Record Owner will assign the scheduled emails to the "Assigned To" user on the record. Note: in relation to Lead records you will need to ensure they are assigned to a User and not a Team in order to use the Record Owner option.
Email or SMS
Where the SMS option is available (Leads, Contacts, Activities, Contracts, Documents, Helpdesk, Opportunities, Projects), you can select whether to include an Email or SMS in your Plan:
For the initial message, you can toggle between the Email and SMS options:
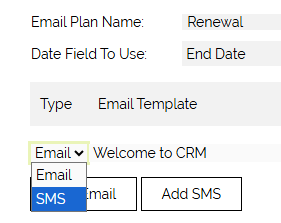
For subsequent messages, use the Add SMS button 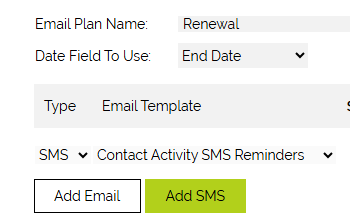
When adding a row for the SMS template, the options will be the same as the email option such as Start In, Hours/ Minutes, Type of time, Nearest Working Day and Users.
Before sending SMS messages, you need to ensure that your users are set up correctly. Here is an FAQ to check this.
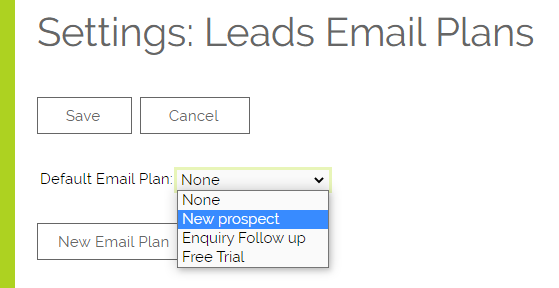
Setting a Default Email Plan
This will automatically set the selected plan in the Email Plan field on any new record created on the chosen module.
PDF generation from Email Plans
You can also generate a PDF from email plan emails. The PDF template can be selected at time of setting up the email plan itself.
The PDF template selector will only appear for Events, Orders, Quotes and Invoices.

When creating a new Email Plan you have a new option to select a PDF template to be associated with it, which can be seen above.
This PDF Template drop down will also have an option "Record" which will then use the PDF that has been set on the record "PDF Template" field itself (if there is one). To remove the PDF Template from being created you will need to select the top blank entry in the dropdown.
Email Plans on Events and Campaigns
Please note that Events and Campaigns offer Email and not automated SMS messaging.
You are able to run an Email Plan on an Event or Campaign level. This gives you the ability to set a series of scheduled emails against subsets of people linked to Events and Campaigns. Therefore you can choose to email all Event Attendees, Prospects, or Staff as well as have the option to email all Contacts linked to an Event. You can also choose to email Staff based on their Staffing picklist value, e.g. you might have "Speakers" at your Event and "Catering" staff who might need to be emailed different information.
An important detail to note is that the recipient list is built at the time of sending the email. You are able to schedule an email days or weeks in advance and continue to add/ remove contacts and the email will only be sent to contacts linked at the time of sending therefore if you had added or removed attendees for example in the run-up to the email, it will be the up-to-date list of recipients that receive the emails. Because of this, scheduled emails are only visible on the Event itself. Once they are sent, they are also visible against the Contacts linked, under the Emails sub-tab.
Events have a Start Date field (on by default) and Start Time field (off by default). If you enable the Start Time when triggering an email plan based on Start Date the Start Time will also be included when determining the time to send. This would allow you for example to cause an email to be sent an hour after the Start Date and Time by specifying that your email plan should run 1 hour after the Start Date.
Set-Up (Campaigns)
Setting up a Campaign Email Plan is identical to setting up any other email plan, with a few key differences. And it's those differences this section of the FAQ is going to explore.
The main difference here is that you can set different groups to receive different emails:

If you'd rather just send all emails to the same group, you can set this at the top of the Email Plan:

Note that setting this value will overwrite any attendee groups previously configured on the Email Plan.
Set-Up (Events)
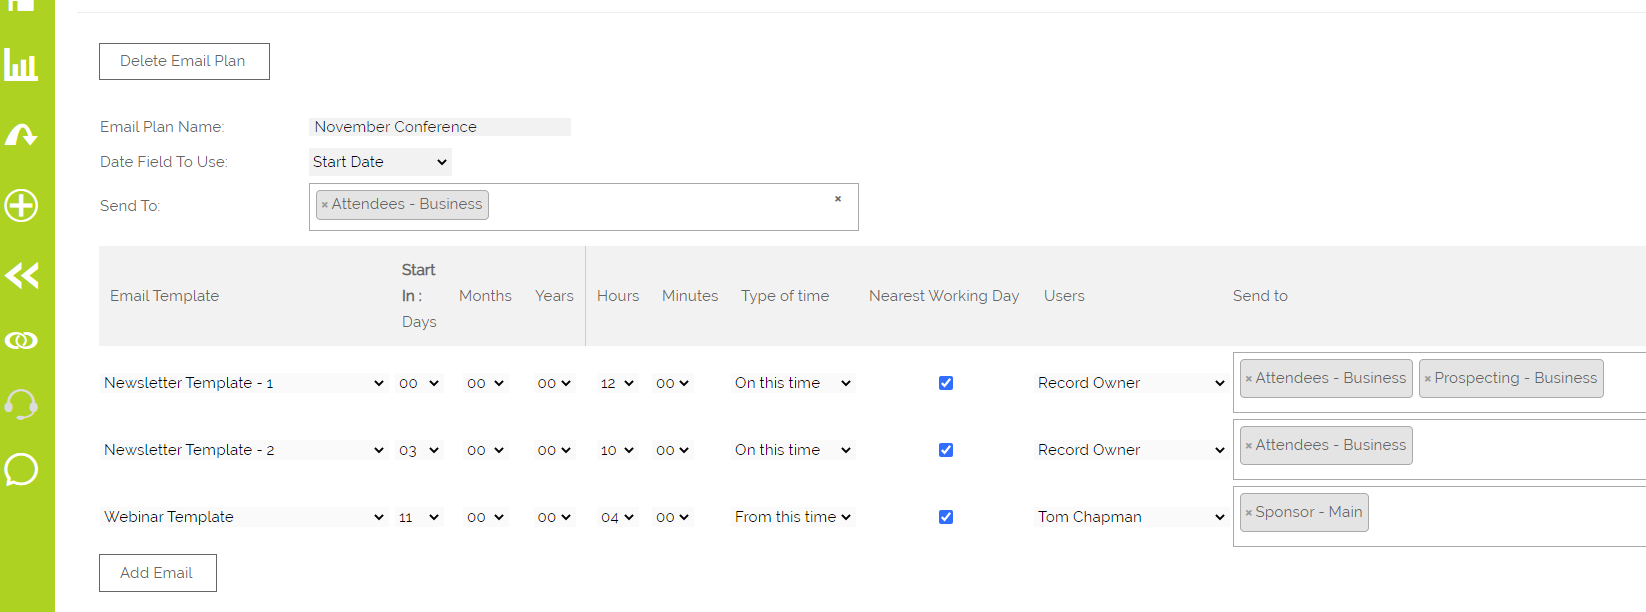
Just like with Campaigns, you now have the option to specify which group of people should receive the Email. This can be set for a whole Email Plan, or individually per Email linked to an Email Plan.
You can set up recipient groups for the whole Email Plan using the Send To field below the Email Plan Name. You are able to select one or more groups of email recipients. Note that you will get a pop-up warning message asking "Do you want to overwrite recipients for all emails in this plan?". Note that setting this value will overwrite any attendee groups previously configured on the Email Plan.
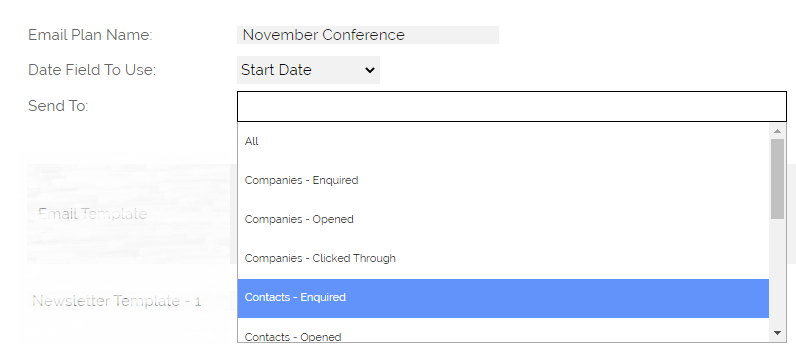
To set recipient groups at Event or Email level you can choose the group at the top of the Email Plan or, if one email is due to go out to a different group, under the Send To column:
Once the Email Plan has been created and saved, you can use it just as you can currently on Leads, Contacts and Companies, by setting the right value in the Email Plan field

This will then schedule the Emails linked on the Email Plan to be sent on the days specified.
The "Send to" list in the Event Email Plans configuration screen has been significantly enhanced - you can target recipients based on a combination of Attendance Status and Contact Type, and selecting which email address to use. For example you can schedule an email to go to the Private Email Address of all Attendees who attended an Event. Another example to automate an email to go to the Business Email Address of all Attendees who graduated.
This is controlled by a setting in Additional Settings: "Show extended event attendee status email options"
Email Plans in Action
To assign a Lead, Contact or Company to an Email Plan edit your record and choose a plan from the Email Plan field. You'll find this on Leads, Contacts and Companies.

Save your record and you will see the Email Plan set as below. Clicking the icon next to the Email Plan field will display a box with the Email Plans to which the record has been subscribed in the past. If you edit the record the Email Plan field will reset to its default "--Select A New Email Plan"--" but the system will always display the last Email Plan selected when on the detail view.

Scroll down to the bottom of your record and select the Emails Sub-Tab (the example below is for the Campaigns Module). Here you will see a list of all emails related to that record including those which are Scheduled and the date on which they are due to be sent.

At the top of your record, you will see a button with two options List Scheduled Emails and List Email Plans. Clicking the first will open a screen listing all Scheduled Emails regardless of whether they form part of an Email Plan and the second will display only those emails which are part of an Email Plan and grouped by the plan.

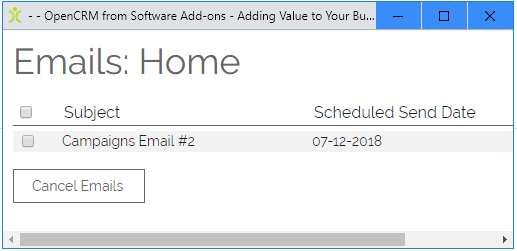
Clicking on List Scheduled Emails will open a window such as this, allowing you to select and cancel any scheduled email
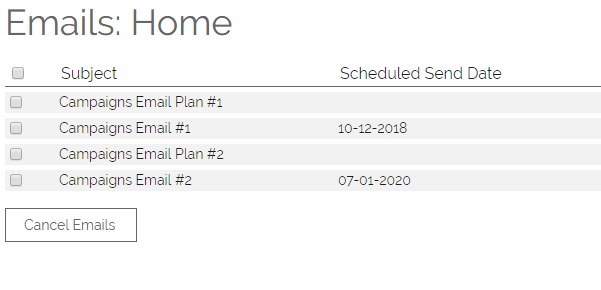
Selecting List Email Plans will open a window such as this, allowing you to cancel individual emails by Email Plan or cancel an entire Email Plan by checking the header row for a given plan.
Note: If you run an Email Plan against an Activity, the email will be sent to the linked Contact or Lead, but will also be linked to the parent Activity.
Conditional Email Plans
OpenCRM can automatically add an Email Plan to a Lead, Contact, or Company when certain conditions are met.
From the Action Plans section of Settings click Conditional Email Plans:
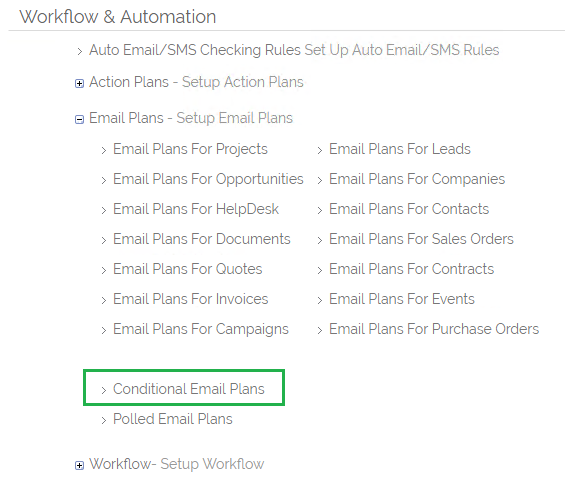
Here you can see existing conditions and add new conditions.

To set up a Conditional Email Plan
After clicking on new you will be taken to the Condition creation screen: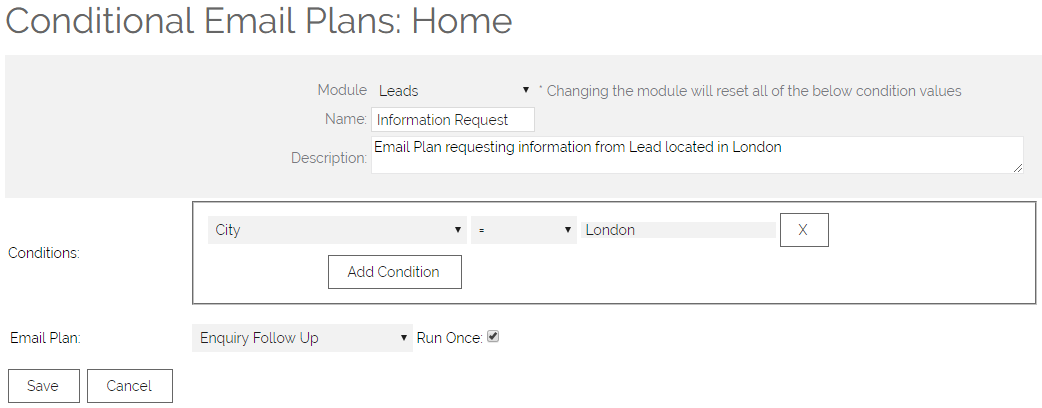
1. Select the module you want to link this Email Plan Condition to. In this example we are creating it for the Leads module.
2. Give your Condition a name and description so you can easily identify its purpose.
3. In the Conditions section in the first column set a field you want to check for a certain value.
For this example, as we are wanting to send this email plan only to people in London, we have selected the City field.
4. In the second choose the condition type; this could be that the selected field "=" (is an exact match for a value) or "Contains" a certain word
5. In the third column specify the value you are checking for.
For this example, as we are wanting to limit this to people from London only we have entered the city name.
6. You can use the Add Condition to add additional conditions that must be met. Note: all the conditions you specify must be met for the Email Plan you select to be set
7. Specify the Email Plan you wish to set when your conditions are met
8. Tick Run Once to ensure that your Email Plan is only activated once. For example below we are checking for Companies of Type "Customer". If Run Once is not selected the Email Plan will be activated repeatedly on a Company when it is saved with the value "Customer" set.
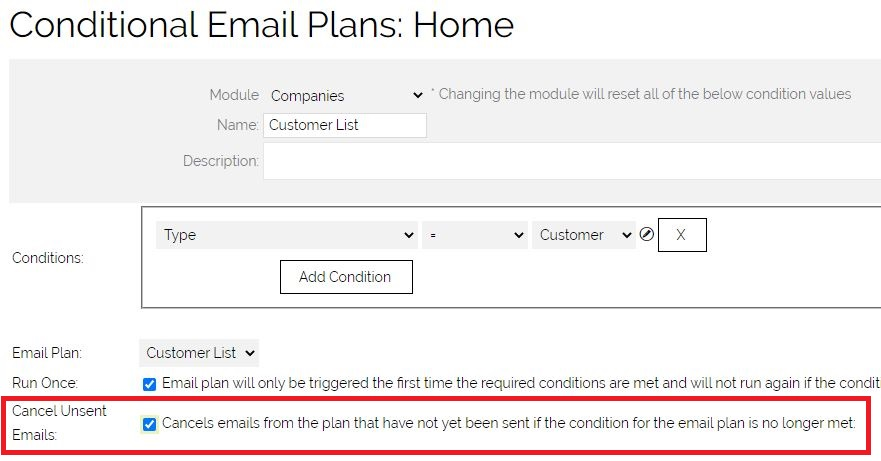
9. You can tick to Cancel Unsent Emails. This will cancel any emails which have not already been sent if your condition is no longer met. This could be useful for example where you send one set of emails to your prospects over a period of time which you want to stop sending if in the meantime they become a customer.
10. Click Save to confirm your changes.
Enhanced functionality around Date fields
There are a number of new options you have available to trigger email plans based around Date fields. These all have practical applications, so here are some examples
When a Date field is Blank
The option "is null/ empty/ zero" is available in the Operator drop down when adding a Condition. This works for all fields, not just Date fields. A practical example is shown below where if a Project End Date is not confirmed, an email is automatically sent to your Customer: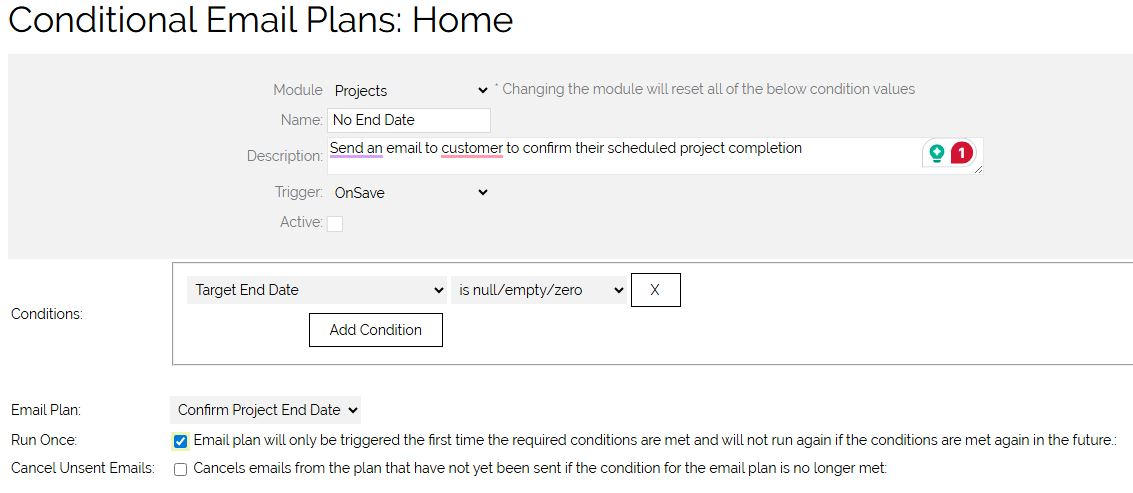
When a Date field is not Blank
The option "is not empty/ zero" is available in the Operator drop down when adding a Condition.It enables you to set up a condition to check that a field contains any value.
You can use this in conjunction with other fields and conditions - in the example below, you have confirmed a Project Target End Date but not a Start Date, so you want to automate an email to go to the customer:

When a Date has Changed
You can trigger an Email Plan (or other Workflow) when a date field has been changed. This has many practical use cases. For example if an Activity Start Date has changed, you can automate an email to send to your customer to alert them of a changed site visit date:
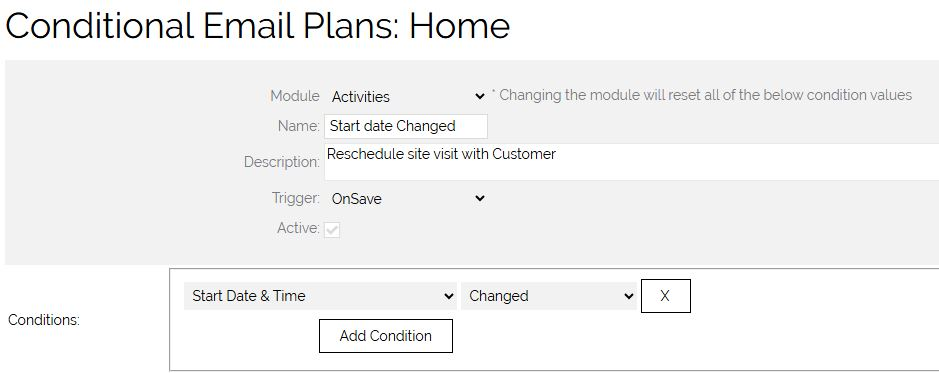
The above options work on Conditional Email Plans, Polled Email Plans and also on Workflow, Data Retention Rules and Right To Be Forgotten Rules.
Polled Email Plans
We have added the ability to set up polled conditional email plans which can run against date fields and trigger email plans when a record meets set date criteria.
An example of this would be to trigger an email plan when an invoice is 7 days past its due date.
The difference between a polled conditional email plan and a normal conditional email plan is that the polled condition is checked daily and if criteria are met the email is sent, whereas a normal condition will only be triggered on save of a record.
To configure a polled conditional email plan you will need administrator access to your OpenCRM system. Go to the Settings menu and scroll down to the Workflow & Automation section. Click on Workflow Settings and you will see the option there.
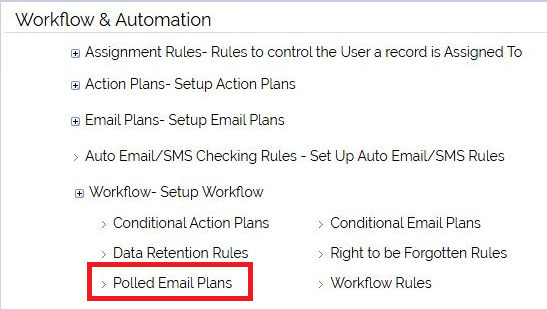
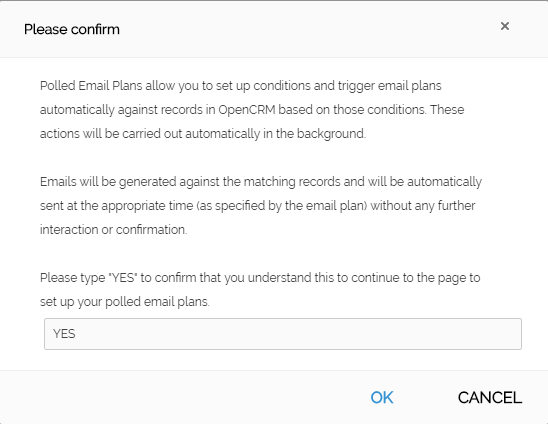
Once selected you will receive a popup warning, similar to Workflows, confirming that these settings will trigger automatically.
To go to the creation screen enter YES and click OK, if unsure please select Cancel and contact support.
Here you can see a list of existing polled conditional email plans and are able to add new conditions:
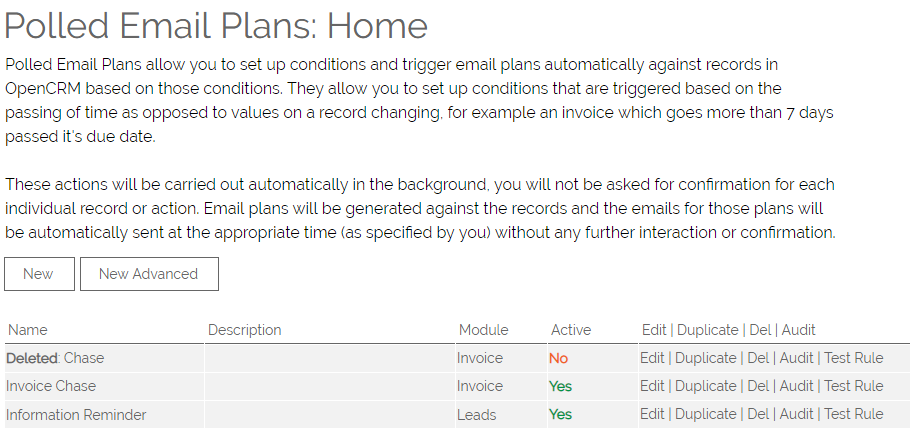
- Module - Shows which module this plan is associated with
- Active - Shows if this is a currently active plan, if it is not this plan will not run
- Edit - Allows you to edit an existing plan
- Duplicate - Duplicate an existing plan
- Del - Delete an existing plan
- Audit - See changes that have been made to this Plan over time
- Test Rule - Will show the records currently matching the criteria
After clicking on new you will be taken to the Polled Emails Condition creation screen:
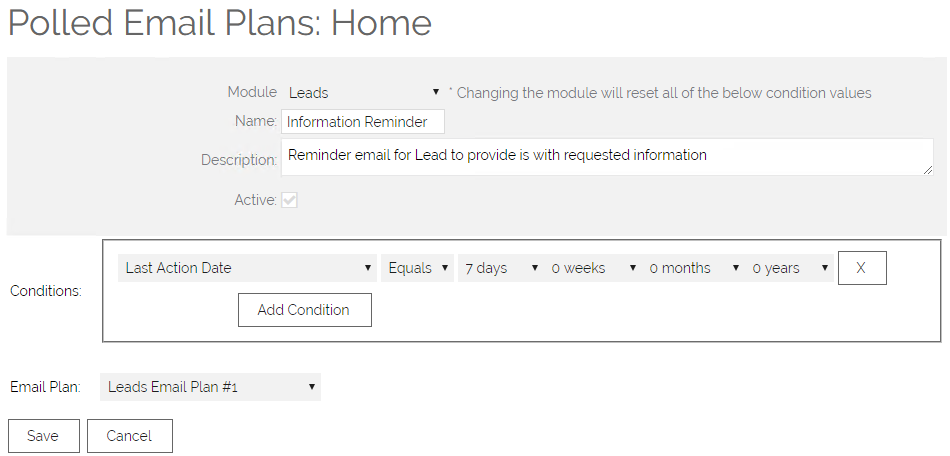
1. Select the module you want to link this polled conditional email plan to. In this example, we are creating it for the Leads module.
2. Give your Condition a name and description so you can easily identify its purpose.
3. In the Conditions section in the first column set a field you want to check for a certain value.
For this example, as we are wanting to send this email 7 days after the last activity we did on that Lead
4. In the second choose the condition type; this could be that the selected field "Equals" (is an exact match for a value) or "Contains" a certain word
This is for any field that is on the Lead, for this example as we are using a date field it shows only options relevant to that type of field.
Another example could be based on Country must be equal to United Kingdom:
5. In the third column specify the value you are checking for.
For this example, as we are wanting to trigger this 7 days after the Last Action Date we have set it to equal 7 days from that date
6. You can use the Add Condition to add additional conditions that must be met. Note: all the conditions you specify must be met for the Email Plan you select to be set
7. Specify the Email Plan you wish to set when your conditions are met
8. Polled conditional email plans will only run once.
9. Click Save to confirm your changes.
After clicking Save you are presented with a new screen listing all the current records you have on the system that this new polled conditional email plan will affect.
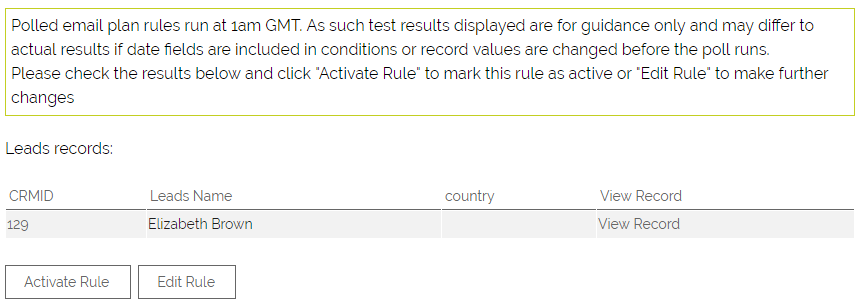
Here you can either Activate the rule or if you notice an error in the records which the rule will affect, go back and edit the rule.
Once Activated the new polled conditional email plan will be listed with the others.
Cancelling Email Plans
There will be occasions when you want to stop an email plan from running. For example, if you have an email plan for customers, if they are no longer a customer, then you will want to stop that email plan from sending further emails. On the Conditional Email Plan screen, there is a Setting that allows you to stop future emails from being sent via that plan if the conditions are no longer met.
Need More Help?
If you have any questions, just start a Live Chat, "Click" on the Chat Icon in the lower right corner to talk with our support team.


