This FAQ has been broken down into two parts:
Basic
This section will guide you through the main steps to building an email template in OpenCRM. You should refer to the email template called 'Basic Email Template Eg' which can be found in your system templates folder. Please note that on completion of this section, the email template you will have built (and our eg template) will NOT be fully compatible style-wise across all email clients, but will be satisfactory.
Advanced
This section is aimed at the slightly more code-savvy User, however, we hope that anyone would be able to give it a go. You should refer to the email template called 'Advanced Email Template Eg' which can be found in your system templates folder. By completing this section, you should be able to build a bulletproof email template which is cross email client compatible.
Pre Build
1. Create a design
Your design could be sketched out either digitally or on paper. The main aim is to really understand how you want your final email to look. Think about the layout, the message you would like to communicate and the styling you would like to use.
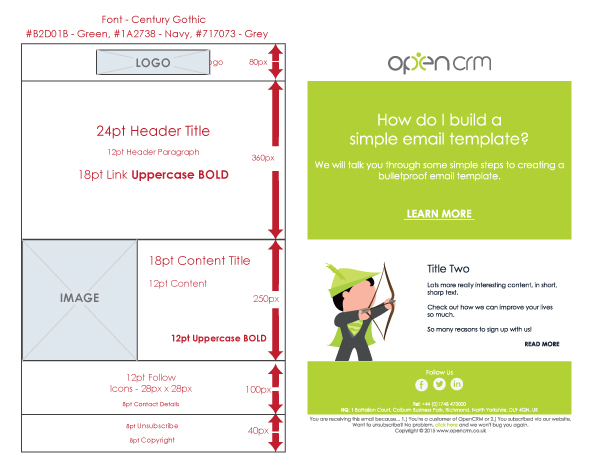
This is the design we put together for our example email template:
2. Create/source images
Create or source the images you would like to use for your template. We recommend you save these as jpegs. Useful information on using images in emails can be found here. If you are going to build the template that we are using as an example, you can find all of the relevant images attached.
3. Make text plain
Copy all text into Text Edit or Notepad and 'Make Plain Text'. Again, if you are building our example, the text file is attached to this FAQ.
4. Colour Codes
Note hexadecimal or RGB colour codes for the colours you would like to use in your design.
5. Create your template
Administrators and System Configurators are able to create, edit, duplicate and delete Email Templates. In order to create a new template, go to the Email Templates go to Settings > Communication Templates > Email Templates > New Template
Fill in the Folder, Template Name and Subject fields as per either our example or as relevant. Click 'Save', then navigate back to the template you just created, click the link to it then and click 'Edit'.
Part 1 - How to build an email template (Basic)
All of this section of the FAQ can be completed using the tools within the TinyMCE Editor Toolbar (We have highlighted any toolbar actions in blue so you know where to look at this stage), except the first step where we will go into the source code very briefly.
We recommend always working with the main editor tool bar open, and the screen on full-screen view.
1. Default text styling & basic code tidy up
In source code remove excess styling from the 'head' of the default template. Manually add in default text styling 'div' (SeeFAQ for details). Click back into the normal editor view.

2. Create table
A table is a simple and effective way to build a basic email template layout. You should see in our layout design how this can easily translate into a table of 5 rows with the middle one split into two.
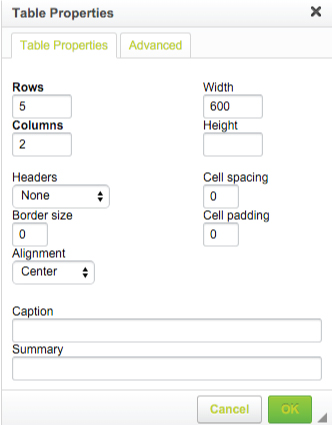
The settings for our template eg are - 600px width, centre aligned, 5 rows, 2 columns, 0 cell pacing, 0 cell padding
3. Merge cells
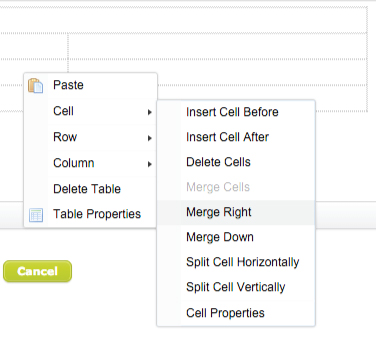
Most of our design is based on a one column layout, except for the one main content section with an image. Therefore you will need to merge all of the cells right (except the main content/middle one) by right clicking within the cell and selecting 'cell properties'.
4. Style cells
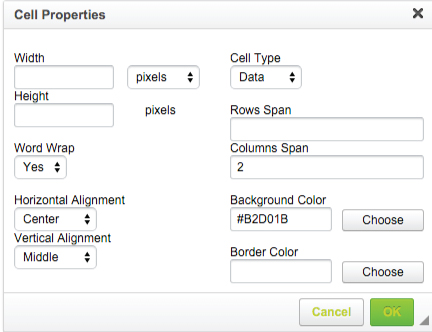
You can add background colours and text alignment to cells via 'cell properties' too. Add a green background (#b2d01b) to the second and fourth row cells. Add centre and middle alignment for the content of all cells except the main content cell which will stay at the default (which is left alignment) for now.
5. Add logo
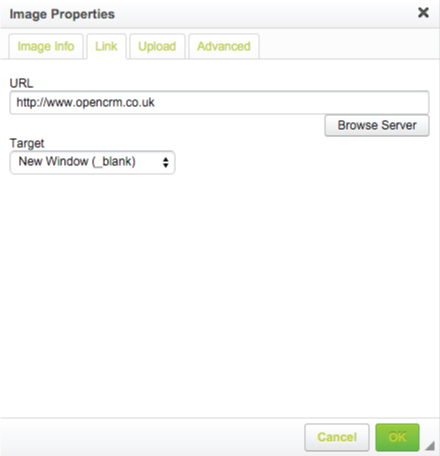
Click within the top cell of the table, using the image editor , copy and paste in the URL of your image location or choose to Browse Server to upload an image into OpenCRM. Add Alternative Text (ALT), alignment, hyperlinks and target - in this example we have set the target to '_blank' so that the webpage loads in a separate window/tab. 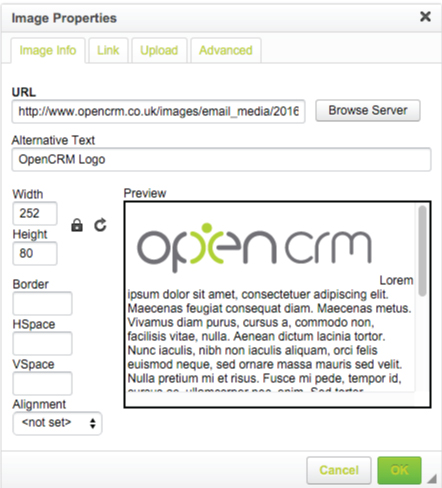
6. Add Text
From your plain text document, Copy and Paste your text into each cell. To style the text highlight the text and use the styling tools to add colours, sizes, font weight and alignment etc.
If you are building our example, please refer to the design for the styling we use. 
7. Insert images
Click within the first cell on the middle row of the table, using the image editor again. Set the URL, ALT text, alignment, hyperlinks, targets etc - in our example we have the image Hspace aligned centre, Vspace aligned to the bottom, ALT text as 'Super Target', a hyperlink to our blog which is set to open in a new window '_blank'.
8. Add Links
Add read more hyperlinks. (Add URL, target, advisory title and styling)
9. Add an Unsubscribe/Click Through links
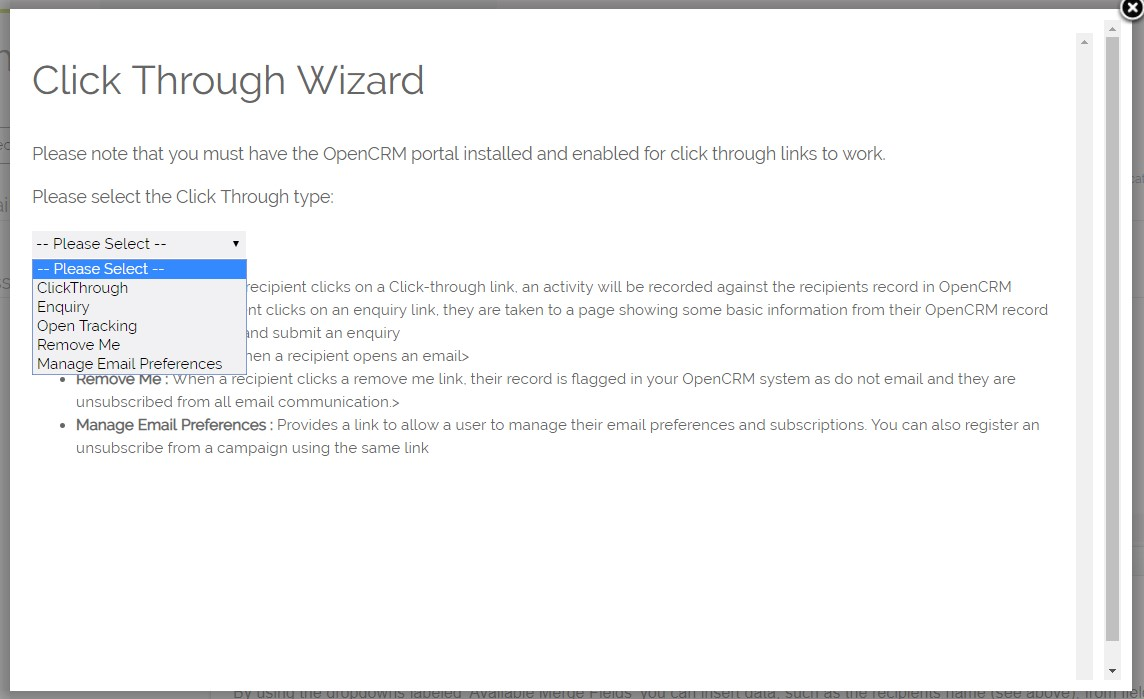
Add these via the Click Through wizard. Copy the link then add it to the text/image you would like to in the same way you did previously in steps 5 and 8. Use this FAQ for further info.
At this stage, you should have a quite basic email template which will look ok in most email clients. Continue through to the Advanced section of this FAQ to create a bulletproof email template.
Part 2 - How to tidy up your email template (Advanced)
All of the following section is completed by going into the Source Code and editing the CSS which is within the HTML. A basic understanding of both of these code languages will help but is not essential.
1. Add spacing
Adding spacing can really help make an email template more readable to the User. However, this is not always as straightforward as it sounds if you would like the same amount of spacing to show in each email client you send your template too.
All the cells in our template contain padding, some have margin. This inline styling generally goes within the cell itself or 'td'. This is what we have used to style our advanced email template eg:
Green Header 'td' - padding: 50px 30px 70px 30px
Learn more 'p' - padding-top: 20px
Main content text 'td' - padding: 20px 0px 0px 0px
Read more 'p' - margin-bottom:20px
Follow Us/ Contact 'td' - padding:15px
Unsubscribe/ Copyright 'td' - padding:15px
1.a Spacing around images
Adding padding and margin styling o certain elements just won't work in some Outlook clients. An example of this is where we have the social media icons, ideally, we would simply add margin or padding within the 'img' tags, but this is not bulletproof. Therefore in this case, as we have added the spacing to the image; in this scenario, this is potentially a good thing as it makes the icons more clickable on smaller screens.
NOTE: You should avoid using ' ' for spacing as these often break when used in conjunction with OpenCRM email templates.
2. Remove spans
There are a few quirks that are unavoidable when using solely the TinyMCE Editor. One of these is excessive code like the overuse of 'span' tags, which can cause problems. We advise that you manually clean your code to make it as short as possible. So for example where the editor has inserted multiple span tags to style one element, combine these either into the element itself or just down to one span tag in total.
For example:

3. In-line CSS for text
To make sure your styling is compatible across all email clients, you need to add it in-line. Gmail is an example of an email client which needs inline CSS to show text styling accurately.
So for example:
If the font family for your text is 'Century Gothic', CenturyGothic, Geneva, AppleGothic, sans-serif', you need to make sure that in every scenario where there is a paragraph 'p' or header 'h1, h2, etc' tag, you have added the style alongside any specific CSS for that element.

4. Styling hyperlinks
In most email clients, default highlighting will occur on both hyperlinks you have added to your email template, and those the client reads as being links; like Skype details, phone numbers or website addresses. The usual highlight for these would be a very bold blue and an underline, which indicates clearly to the reader that that line of text is a link.
Now, in most email templates this default styling is fine and very useful so not to be underestimated. In our example template however, we would like to customise how our links stand out.
To do this, we need to make sure that both the surrounding tag for the element the link 'a' itself is both contain the CSS styling; this should ensure the styling in picked up across various email clients.

Need More Help?
If you have any questions, just start a Live Chat, "Click" on the Chat Icon in the lower right corner to talk with our support team.


